Welcome to the documentation for FireRatShader. This shader is designed to be a powerful but efficient Uber shader that works in VR, Android, Mobile, Windows, and Unity 6 across both render pipelines: Built-in Render PipelineUniversal Render Pipeline
Both pipeline versions share the exact same 899 properties, inspector layout, and feature sets in 100% lockstep parity.
Pipeline Variants & Master Shaders
Renderer Requirement:BRPThe Built-in RP version only works in projects using the Built-in Render Pipeline.URPThe URP version only works in projects using the Universal Render Pipeline.
Master Shader Pairs:
Master Uber:FireRat/FireRatShaderBRPandFireRat/FireRatShader_URPURP — Full-featured master shader for characters, clothing, and props.
Two-Pass Transparency:FireRat/FireRatShader_TwoPassBRPandFireRat/FireRatShader_URP_TwoPassURP — Dual-pass rendering (backface depth prepass + frontface) for eliminating alpha sorting artifacts on complex transparent meshes.
Shell Fur Extrusion:FireRat/FireRatShader_FurBRPandFireRat/FireRatShader_URP_FurURP — Vertex shell extrusion (1–16 layers) with tapering procedural strands, wind sway and gravity vectors for furry avatars and plush fabrics.
Use the navigation on the left to jump to a specific feature section. Each section corresponds to a foldout in the material inspector.
VRChat Avatar Setup
The FireRat Shader Avatar Setup tool is a powerful utility designed to automatically generate the necessary VRChat assets (FX Controller, Expressions Menu, and Parameters) to control the shader's features in-game. This saves you the time and effort of manually creating animations and menu toggles.
How to Use
Open the Tool:Navigate toTools > FireRat Shader > Avatar Setupfrom the top menu bar in Unity.
Select Your Avatar:In the setup window, select your avatar's descriptor from the "Avatar" object field. The tool will automatically find all Skinned Mesh Renderers on your avatar.
Choose Target Meshes:By default, all found renderers are selected. You can uncheck any renderers that you do not want the generated animations to affect.
Select Features:Use the toggles in the "Feature Selection" area to choose which shader features you want to create menu controls for.
Each feature has a master toggle to enable or disable the entire group.
Within each group, you can select individual controls (e.g., just an "Enable" toggle, or also a "Width" puppet) to save parameter memory.
The "Total Parameter Cost" display at the bottom shows how much of your VRChat parameter budget your selections will use.
(Optional) Merge Controllers:If you are using another system that has its own FX Controller (like GoGo Loco), you can select it in the "Base FX Controller" field. The tool will merge its animations into a copy of that controller instead of the VRChat default.
Generate Assets:Click the "Generate and Merge Assets" button. The tool will create a new folder inAssets/FireRatShader/Generated/[YourAvatarName]containing all the necessary menus, parameters, and animations. It will then automatically assign these to your avatar descriptor.
Important: Two-Step Feature Enablement
For an expression menu control to work in-game, the corresponding feature must be enabled intwo places:
In the Material Inspector:You must enable the feature on the material itself (e.g., check the "Enable" box for "Outline").
In the Avatar Setup Window:You must select the corresponding control(s) for that feature (e.g., check "Outline Menu Controls").
This is because the shader is heavily optimized. If a feature is not enabled on the material, its code is completely removed from the shader to save performance. If you generate a menu control for a feature that is disabled on the material, the menu option will appear in-game but will do nothing, because the shader code it's trying to control doesn't exist.
Saved Settings
The tool automatically saves your feature and mesh selections for each avatar. When you select an avatar, it will remember the last configuration you generated for it, making it easy to make small changes without starting from scratch.
Material Inspector Tools
The top of the material inspector provides a toolbar with workflow tools that apply to the whole material. Each foldout section in the inspector also has its own Copy, Paste, and Reset buttons.
Material Locking
Materials can be locked to prevent accidental edits. When locked, every control in the inspector is grayed out and read-only, and the toolbar shows a red🔒 Material Locked (Click to Unlock)button. Use🔑 Lock Materialon an unlocked material to lock it again.
Load Presetand sectionPasteare disabled on locked materials.
Lock state is stored on the material itself (a hidden _MaterialLocked property and override tag), so it persists across saves and applies to all targets when editing multiple materials at once.
Locking Can Optimize Your Shader:Since V1.0.5, locking a material for a specific target (Avatar, World, or Standalone Build) also runs theMaterial Lock Shader Optimizer. It analyzes which features are actually in use and strips the rest, for example removing the Outline or Refraction passes and dead keyword variants when those features are disabled. This produces a smaller, faster shader variant tuned exactly to your material — ideal for VRChat avatar and world uploads.
Material Presets
Presets let you save the entire material state to a JSON file and load it back onto other materials, making it easy to share or reuse a look across your project.
Save Preset...Exports all of the material's float, range, color, vector, and texture properties (including texture tiling and offset) to a JSON file in your project.
Load Preset...Imports a previously saved JSON preset onto the selected material. Properties that don't exist on the current shader are skipped. Disabled while the material is locked.
Curated Preset Library:A selection of ready-made master presets ship with the package as starting points you can load viaLoad Preset....
Section Copy / Paste / Reset
Every foldout section in the inspector hasCopy, Paste, andResetbuttons in its header.
Copy:Copies all properties in that section (floats, colors, vectors, and textures with their tiling/offset) to the shader's clipboard.
Paste:Applies the copied section values to the selected material(s). It is only enabled for the same section the values were copied from, and is disabled on locked materials.
Reset:Restores the selected section's properties to their shader defaults.
Live Property Search
The inspector toolbar includes a search field that live-filters all material properties by name or label as you type. Matching sections auto-expand so you can immediately see (and edit) every hit, making it fast to locate a specific control among the shader's hundreds of properties. Fuzzy matching tolerates typos and partial words, and clearing the box restores the normal foldout layout.
Performance
Performance Level
This setting provides a master control to quickly set a performance baseline for different platforms without needing to toggle dozens of individual checkboxes. It adjusts the shader's complexity by disabling the most performance-intensive features at lower levels.
High:All features are available to be enabled. This is the default setting and offers the highest visual quality.
Medium:Disables features that are moderately to highly expensive, providing a good balance between visuals and performance. The following features are disabled:
Parallax Mapping
Anisotropic Reflections
Subsurface Scattering (SSS)
Low:Disables a wider range of effects, forcing simpler lighting models and disabling all but the most basic features. This setting is ideal for less powerful hardware or for ensuring maximum performance. In addition to the features disabled in Medium, the following are also disabled:
Toon and Stylized PBR lighting modes
Crystal and Glitter surface styles
Intersection Effect
Ripple Effect
Vertex Distortion
When a feature is disabled by a performance level, its controls in the material inspector will be grayed out.
Distance LOD Start
Automatically simplifies the shading as the object moves away from the camera. SettingDistance LOD Startto a non-zero distance will progressively disable expensive per-pixel lighting and shading work at that range, trading a little visual fidelity for a large frame-time saving on distant objects. A value of0keeps the full-quality shading at every distance (disabled).
Main Settings
Render Mode
Controls the fundamental rendering behavior of the material.
Render Mode:Sets the transparency type.Opaqueis fastest.Cutoutuses an alpha threshold for hard-edged transparency.Transparentallows for soft, blended transparency.Additiveadds its color to what's behind it, useful for bright effects.Multiplydarkens what's behind it (useful for shadows and tint overlays).Premultipliedblends using premultiplied alpha, giving correct edges for glow/particle-like textures without dark halos.
Cut Holes In Opaque:On by default. Lets Dissolve, Clipping Mask and Chroma Key cut real holes in an Opaque material, including its shadow, depth and outline. Turn it off to keep the surface whole (the dissolve edge colour and mask then only tint it) and skip alpha testing in the opaque passes, which some mobile GPUs such as Quest prefer.
Queue Offset:Offsets the render queue relative to the selected Render Mode.
Force Depth Write (ZWrite):Manually controls if the material writes to the depth buffer. Useful for transparent objects that need to occlude others.
Alpha Cutoff:The alpha value at which pixels are discarded inCutoutmode.
Shadow Cutoff Override:When enabled, uses theShadow Cutoffvalue for the shadow-casting pass instead of the material's Alpha Cutoff, so the shadow silhouette can be independently tuned (e.g. tighter or softer than the visible cutout).
Base Appearance
Use Base Color:Toggles a solid base color for the material.
Color:The main color of the material. Can be hue-shifted.
Use Vertex Colors:Tints the material using colors painted onto the model's vertices.Vertex Color Modeselects how they combine with the base color:Replaceuses the vertex color outright,Multiplytints the base color, andAddbrightens it.
Enable Back Face Color:Uses a separateBack Face Colorfor the back-facing sides of the mesh, letting you color the reverse side differently (useful for thin meshes like wings or clothing). The color can be hue-shifted.
Use Base Texture:Toggles the main texture of the material. Tiling and Offset can be adjusted in the texture inspector.
Queue Offset
Fine-tunes the material's render queue position relative to its base render mode. This is essential for resolving z-sorting issues with layered transparent materials like hair, clothing overlays, and accessories.
Queue Offset:Shifts the render queue by the specified amount (range: -50 to +50). A higher value renders later (on top), a lower value renders earlier (behind). Default is0.
Alpha-to-Coverage Sharpening & Mip Scaling
When usingAlpha to Coveragein Cutout mode with MSAA enabled, this feature controls the sharpness and distance stability of the anti-aliased edge at the cutout boundary — ideal for hair cards and foliage in VR.
A2C Edge Sharpening:Controls the gradient width at cutout edges.0uses standard alpha-to-coverage. Higher values produce sharper, crisper cutout edges using screen-spacefwidth()derivatives.
A2C Mip Scale:Multiplies the derivative divisor across texture mipmap levels to prevent cutout edges from unnaturally thinning out or disappearing at medium-to-far viewing distances in VR headsets.
These controls appear when Render Mode is set to Cutout and Alpha to Coverage is enabled.
Advanced Backface Rendering
Extends the existing Back Face Color feature with support for a completely separate texture and independent emission on back-facing triangles. This is ideal for jacket interiors, capes, double-sided curtains, or any mesh where the inside should look different from the outside.
Use Backface Texture:When enabled, samples a separate texture for back-facing triangles instead of using the flat Back Face Color.
Backface Texture:The texture applied to back-facing geometry. Uses its own UV tiling and offset controls.
Backface Emission Color:An independent emission color applied only to back faces.
Backface Emission Strength:Controls the intensity of the backface emission (range: 0–10).
This feature incurs zero cost when disabled. The keyword _BACKFACE_TEX_ON is only compiled into the shader when the toggle is active.
Video Player Mode
Enables compatibility with Unity's Video Player component and AVPro Video. Video textures often require special handling for gamma correction and UV coordinate flipping that standard textures do not need.
Video Player Mode:Master toggle that enables video texture handling.
Is AVPro:When enabled, applies AVPro-specific corrections: flips the texture's Y coordinate (AVPro outputs upside-down) and applies gamma-to-linear correction (pow(color, 2.2)) since AVPro outputs in gamma space.
WhenIs AVProis disabled, the shader assumes a standard Unity Video Player texture which requires no special correction.
Global UV Controls
These controls affect all textures and UV-based effects on the material.
Use Ping-Pong Scroll:Animates UVs back and forth instead of in one direction. Provides Speed and Range controls.
Scroll Speed X/Y:Scrolls all UVs at a constant speed.
Rotation:Rotates all UVs around the center (0.5, 0.5) of the UV space.
Projection Mode & UV Set:Many textures in the shader offer two extra selectors.Projection Modechooses how the texture is mapped onto the model (UV, World Space triplanar, Local Space triplanar, Screen Space, Planar, Spherical, Cylindrical, Biplanar, Panosphere (Equirectangular 360), or Polar Coordinates). AUV Setselector instead picks between UV0 and UV1 for that texture. These appear next to the affected texture's controls.
UV Flow (Pathing)
Animates textures along a vector flow map using two seamlessly crossfading phases, creating continuous directional motion without visible looping — ideal for rivers, conveyor belts, wind streaks, and magic trails.
Enable UV Flow (Pathing):Master toggle.
Flow Map:RG channels encode direction vectors (0.5= neutral), with a UV Set selector.
Flow Speed / Flow Strength:Animation speed and the magnitude of UV displacement along the flow vectors.
Cycle Rate:Frequency of the dual-phase crossfade cycles that keep the motion seamless.
UV Tile Discard
Discards geometry per tile of a 4×4 UV grid (0–1 mapped to each 0.25 tile), letting you toggle clothing parts, accessories, or hair pieces on and off from one mesh without blendshapes. Applied consistently across every pass (main color, outline, shadow, depth).
Enable UV Tile Discard:Master toggle.
UV Tile Grid (4×4):Clickable grid of 16 tiles; toggled tiles are discarded. Rows map to the texture's V axis (Row 0 at the bottom).
UV Distortion
Warp the UV coordinates using a texture, creating effects like heat haze or water ripples.
Distortion Map:A texture whose Red and Green channels control the X and Y offset of the UVs.
Strength:The intensity of the distortion.
Scroll Speed X/Y:Scrolls the distortion map to animate the effect.
Flipbook Animation
Animates the main texture by treating it as a grid of frames (a spritesheet).
Mode:Playback mode (Loop, PingPong, Random).
Columns (X) / Rows (Y):The number of frames in the spritesheet grid.
Speed (FPS):Animation speed in frames per second.
Start Frame:The initial frame of the animation, allowing for an offset.
Stochastic Texture Sampling
Procedurally blends randomized texture samples across triangular lattices to completely eliminate repetitive tiling patterns on large surfaces (floors, walls, terrain).
Stochastic Scale:Controls the scale multiplier for the triangular blending distribution.
Texture Mipmap & Quality Tools
An interactive utility integrated directly into the material inspector to configure texture mipmapping algorithms and anisotropic filtering across all textures assigned to the material in a single click via Unity'sTextureImporter.
Generate Mip Maps:Enables or disables mipmap pyramid generation on all assigned textures. Disabling mipmaps is useful for crisp pixel-art textures that should never blur with distance.
Mipmap Filtering:Selects the downsampling algorithm used when generating mip levels:
Box Filter:Smooth spatial box averaging as mipmap levels decrease in resolution, producing soft transitions.
Kaiser Filter:Runs a sharpening algorithm on downscaled mip levels to preserve crisp details and sharp edges at distance (strongly recommended for VR headsets and VRChat avatars).
Anisotropic Level:Adjusts anisotropic filtering (Disabled, 2x, 4x, 8x, or 16x) to preserve crisp micro-details and prevent blurring on surfaces viewed at steep grazing angles (such as floors, walls, and clothing folds).
Apply Mipmap Settings:Iterates over every texture slot assigned to the material, applies the selected mipmap and anisotropic options directly to their asset importers, and triggers an asset reimport.
Emission (Slots 1 – 4)
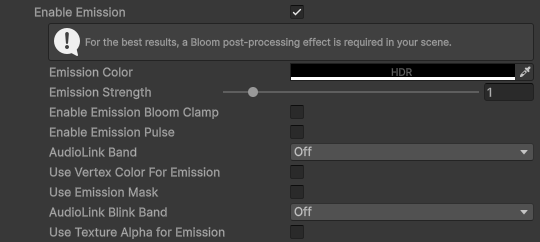
Makes the material glow with up to 4 independent emission layers. Requires a Bloom post-processing effect in your scene to see the full effect.
Emission with the first slot enabled.
Emission Color:Dedicated HDR base emission tint (default black). When emission is enabled, the surface emits light based on Emission Color × Emission Strength, and the Emission Mask acts as the emission map multiplying this color. Backface, pulse, and procedural emission add on top. Both forward shading and baked lightmaps (Meta pass) share this formula.
Strength:Brightness of the primary glow. Values greater than 1 will bloom.
Use Vertex Color for Strength:Modulates emission strength using the model's vertex color (Green channel).
Use Emission Mask:Uses a texture to define which parts of the surface emit light (emission map). The mask has its ownUV Set, Projection Mode, andMask Scroll Speed X/Ycontrols.
Use Texture Alpha for Emission:Uses the main texture's alpha channel as an emission map.Alpha Emission Strengthcontrols the brightness of this emission.
AudioLink Band:When a band other thanOffis selected, the emission strength is modulated by that audio band.AudioLink Strengthcontrols how strongly.
AudioLink Blink:When a band other thanOffis selected in theAudioLink Blink Bandselector, the emission stroboscopically blinks with the music.
Enable Emission Bloom Clamp:Clamps the maximum perceived HDR luminance of the emission output using a smooth $C^1$-continuous soft-knee compression curve. This prevents high-intensity AudioLink volume spikes or overexposed emission maps from producing blinding whiteouts in VRChat and HDR post-processing bloom pipelines.
Max Luminance:The upper luminance threshold ceiling (range: 0.1–50.0).
Soft Knee:Controls the softness of the shoulder transition into the luminance clamp (0.0= hard linear clamp,1.0= maximum smooth roll-off).
Second / Third / Fourth Emission:Independent secondary, third, and fourth emission maps, each equipped with its own HDR Color tint, Strength multiplier, independent X/Y scrolling animation, and dedicated AudioLink frequency band reactivity.
Fluorescence Emission
Makes the material glow in response to scene light levels — the less light hits it, the more it glows. Perfect for glow-in-the-dark accents, UV-reactive paint, or emergency-lights that only appear in dark rooms.
Enable Fluorescence:Master toggle.
Fluorescence Map (RGB):Texture defining where the glow appears, with a UV Set selector.
Color:HDR color tint of the glow.
Strength:Glow brightness.
Light Threshold:Light level below which fluorescence activates.
Hardness:Transition sharpness between dark and lit states.
Glow Only in Dark:When enabled, the glow is restricted to low-light environments (classic glow-in-the-dark).
Transparency
Transparency controls once enabled.
Enable Transparency:Makes the object uniformly transparent.
Enable Fresnel Transparency:Makes the object more transparent in the center and opaque at the edges, based on the viewing angle.
Power:Controls the falloff of the fresnel effect.
Edge/Center Alpha:Sets the transparency at the grazing edges and the center, respectively.
Enable Dithered Transparency(sorting-free screen-door transparency) andEnable Near Camera Fadeare documented in theTransitionssection, where they appear in the material inspector.
Procedural Textures
Procedural Texture Generation
This feature allows you to replace the standard base texture with a procedurally generated pattern. This can reduce texture memory usage and allow for dynamic, animated effects without external texture files.
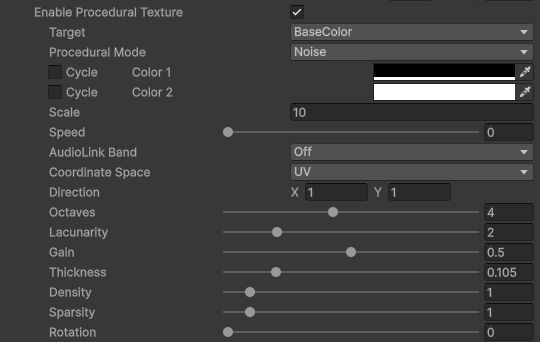
Procedural Texture settings (Noise mode).
Enable Procedural Texture:Toggles the entire feature on or off. When enabled, it overrides the Base Texture and Base Color settings.
Mode:Selects the pattern to generate.
Noise:A classic, smooth value noise pattern (similar to Perlin noise).
Octaves:Adds layers of noise at different scales to create much more detailed and natural patterns (like clouds or marble instead of just a soft blur).
Lacunarity:Controls how the frequency of the noise changes with each octave.
Gain:Controls how the amplitude of the noise changes with each octave.
Voronoi:A cellular pattern, like cracked earth or biological cells.
Style:Controls the visual style of the Voronoi pattern.
Distance:The current smooth gradient effect.
Color:Assigns a random solid color to each cell.
Edges:Draws only the borders between the cells for a classic "cracked" look.
Stripes:Parallel lines that can be animated or static.
Dots:A grid of circles. The Thickness property controls their radius.
Box Fractal:A fractal pattern based on repeated squares.
Truchet Tiles:A pattern of quarter-circle arcs with random orientations.
Truchet Lines:Connected line segments in a maze-like pattern.
Spirals:Archimedean spirals emanating from the center.
Radar:Concentric circles and radial spokes, like a radar screen.
Sine Waves:Horizontal sine wave patterns.
Cross Fractal:A fractal pattern based on repeating crosses.
Mandelbox:A 2D slice of the 3D Mandelbox fractal.
Color 1 / Color 2:The two colors used to create the pattern. The generated value is used to blend between them.
Color Shift
Color 1 Shift:Toggles hue shifting for Procedural Color 1. The speed is controlled by the globalAnimation Speedin "Global Color Animation" (Color Controls).
Color 2 Shift:Toggles hue shifting for Procedural Color 2. The speed is controlled by the globalAnimation Speedin "Global Color Animation" (Color Controls).
Scale:Controls the size or tiling of the generated pattern.
Speed:Controls the speed of the pattern's animation.
Coordinate Space:Controls whether the pattern uses UV coordinates or world space positioning.
Direction:Controls the animation direction as a 2D vector (X, Y).
Thickness:Controls line thickness for patterns, or dot radius for dot patterns. Not applicable to Sierpinski or Checkerboard patterns.
Density:Controls the size of pattern elements. Higher values make elements larger.
Sparsity:Controls the spacing between elements. Higher values increase spacing.
Rotation:Rotates the entire pattern. A value of 0.125 equals 45 degrees.
Procedural Texture Target
This feature allows you to use the generated procedural texture as a mask or input for other shader features, instead of just using it as the base color. This is a powerful way to create complex, dynamic effects by combining procedural patterns with other material properties.
Target:Selects where the procedural texture output will be sent.
Base Color:(Default) The procedural texture is used as the main albedo/color of the material, overriding the standard Base Texture and Base Color.
Emission Mask:The procedural texture controls the intensity of the Emission. The generated pattern will define the glowing parts of the material.
Metallic/Gloss Mask:The procedural texture's Red channel controls the Metallic property, and the Green channel controls the Smoothness property. This allows for creating surfaces with procedurally animated metallic or shiny patterns.
Detail Mask:The procedural texture acts as a mask for the Detail Texture, controlling where the detail texture is visible.
Dissolve Mask:The procedural texture is used as the pattern for the Dissolve effect, allowing you to create animated, procedural dissolve transitions without needing a separate texture map.
Advanced Animation Controls
These controls enable shader-driven animation of time-based effects, offering more precise control than Unity's default time variables.
Enable Advanced Animation Controls:Toggles the custom time system. When disabled, the shader uses Unity's default_Timevariable.
Animation Time Scale:Multiplies the speed of all time-based animations in the shader.
Play Mode:Controls how the animation time progresses.Loopcycles from 0 to 1 and repeats.PingPongcycles from 0 to 1 and then back to 0.
Animation Offset:Adds a static offset to the animation time, useful for synchronizing multiple animated materials or starting an animation at a specific point.
Enable Network-Synced Time:Synchronizes shader continuous animation clocks across network clients via AudioLink / Udon chronological time, completely preventing animation drift between players in VRChat.
Photosensitivity Strobe Clamp:Safety feature that limits maximum strobe/flash frequency in Hz across pulse, flicker, and glitch animations to safeguard against epileptic seizures.
Color Controls
A set of controls that affect the final look of the material.
Global Color Animation
This setting controls how all colors with "Animate Hue" enabled will change over time.
Enable Global Auto Color Shift:Master toggle that continuously animates every color with a shift control enabled. When disabled, shift sliders hold static or externally animated values.
Animation Mode:Can be set toHue Shift(the default rotating rainbow effect) orGradient.
Animated Gradient:When in Gradient mode, you can provide a texture (like a long, thin gradient) that all animated colors will scroll through. This gives you precise control over the color palette of your animations.
Ping-Pong Animation:(Gradient Mode Only) Animates the gradient back and forth instead of looping.
Use Vertical Scroll:(Gradient Mode Only) Scrolls the gradient from top to bottom instead of left to right.
Animation Speed:Controls the speed of the selected animation mode (rotation speed for Hue Shift, scroll speed for Gradient).
Color Adjustments
Hue Shift:Rotates the final color's hue around the color wheel. Combined with "Enable Global Auto Color Shift", this drives the rainbow animation; combined with AudioLink it becomes audio-reactive.
Saturation:Multiplies the color saturation (0=Grayscale, 1=Default, 2=Vibrant).
Value (Brightness):Scales the HSV value (brightness) of the final color.
Desaturation:Blends the final color towards grayscale.
Invert Color:Inverts the final color.
Final Color Tint:Multiplies a color over the final result, useful for tinting or grading.
RGBA Color Masking & Global Mask Routing
Enables 4 independent color zones and emissive channels driven by the RGBA channels of a single mask texture, allowing complete outfit recoloring and cross-module routing from one material.
RGBA Color Mask:The mask texture isolating 4 distinct zones in R, G, B, and A channels.
Red / Green / Blue / Alpha Tint:Multiplicative color tint applied to geometry where that channel is active.
Red / Green / Blue / Alpha Emission:Independent HDR emission color applied to each zone.
Global Mask Channel Routing:Routes individual mask channels (R, G, B, or A) to modulate secondary shader features:
MatCap Mask Route:Selects a mask channel to modulate MatCap intensity.
Rim Mask Route:Selects a mask channel to isolate Rim lighting.
Glitter Mask Route:Selects a mask channel to restrict Glitter sparkles.
Dissolve Mask Route:Selects a mask channel to bias or control the Dissolve transition progression.
OKLab Color Blending:Enables Björn Ottosson's perceptually uniform OKLab color space blending for color tints, theme colors, and mask transitions. Eliminates the muddy desaturation and dirty gray intermediate colors inherent to naive sRGB/linear lerping.
Global Theme Colors
Defines 4 global master colors that drive a unified theme across multiple materials on an avatar or prop, so base color, outlines, rim, and emission can all pull from the same shared palette modulated by a single source — much like AudioLink's world theme system, but authored on your own materials.
Theme Color 1 / 2 / 3 / 4:The four master color slots.
Modulation Mode:How the theme colors are animated beyond their static values:
Direct: The theme colors are used as-is.
AudioLink:A selectableAudioLink Bandhue-shifts the theme colors with the music;AudioLink Strengthcontrols the intensity.
HueShift:Continuously rotates the theme colors through the color wheel atHue Shift Speed.
Theme Target Mask:A 4-component weight vector routing theme influence to each module — R = Base Color, G = Outlines, B = Rim, A = Emission. Setting a component to0keeps that module at its local color;1fully drives it from the theme palette.
Color Correction
Brightness, Contrast, Gamma:Standard color correction controls.
Pixel Effects
Applies screen-space effects to create retro or stylized looks.
Pixelation:Creates a blocky, low-resolution effect. The Amount controls the number of 'pixels' across the texture.
Posterization:Reduces the number of colors in the material, creating a "posterized" look. Levels controls the number of color steps per channel.
Color Mask
Uses a texture to mask the material's alpha (visibility), cutting out parts of the surface or restricting the material to specific regions.
Color Mask (RGBA):The mask texture. Use its Tiling/Offset to position it, and theUV Setselector to pick between UV0 and UV1.
Alpha Source:Selects which channel of the mask drives the alpha:None, R, G, B, orA. The chosen channel is multiplied into the final transparency.
Lighting
Controls how the material reacts to lights in the scene. This section is disabled if a Surface Style like MatCap (only when its Blend Mode is Override), Skybox, or Galaxy is chosen, as they provide their own lighting.
Lighting Modes
Unlit:The material is not affected by scene lighting.
Basic:A simple Lambertian lighting model.
Toon:A two-tone "cel-shaded" look with a hard shadow edge.
Stylized PBR:A simplified Physically Based Rendering model for metallic and smooth surfaces.
Standard PBR:An industry-standard Physically Based Rendering model using GGX microfacet distribution, reflection probes, and lightmap support.
Properties
Shadow Color:The color of the unlit areas of the model. (Applies to Basic and Toon modes).
Use Ambient Lighting:Toggles sampling of scene ambient light and reflection probes. Makes lighting more consistent across different worlds. (Applies to Basic, Toon, and Stylized PBR modes). While enabled, two extra selectors appear:Ambient Fallback Modechooses the fallback lighting model (FlatorGradient) used when High Quality Ambient (SH) is disabled or unavailable, andShadowmask Fallbackselects how baked shadowmask attenuation is applied (AmbientorShadow Color).
Enable Environment Reflections:Samples reflection probes to add environmental reflections even in Basic/Toon modes, giving surfaces a subtle shiny response to the scene.Strengthcontrols how visible the reflections are, andRoughnesscontrols how blurry they are. (Disabled on Medium/Low performance levels).
Enable Custom Cubemap Reflection:Adds a user-providedCustom Cubemapthat substitutes or supplements the scene's reflection probes, ideal for local reflections on props or as a fallback in probe-less worlds.Cubemap Tintcolors the reflection,Roughnessdrives its blur (sampled as a mip level), andBlend Modeselects how it combines:Override Probesalways adds the cubemap reflection,Fallback When Probes Darkonly adds it where the existing probe contribution is nearly black, andAdditivestacks it on top unconditionally.Intensityscales the reflection brightness.
Enable LTCGI (Area Light GI):Receives the world's LTCGI video screens and area lights (Linearly Transformed Cosines, diffuse and specular, per pixel) through LTCGI's own shader code. Needs the LTCGI package (at.pimaker.ltcgi) in the project; the include is generated when the package is added or removed, so the shader compiles either way, and without it this adds nothing.Intensityscales the area-light diffuse and specular contribution, andRoughness Multiplierwidens/blurs the specular highlight response. (Disabled on Medium/Low performance levels).
Unity 6 URP Adaptive Probe Volumes (APV):URPThe shader compilesPROBE_VOLUMES_L1 / PROBE_VOLUMES_L2fragment variants so ambient lighting automatically participates in Unity 6 / URP 17+ Adaptive Probe Volumes, replacing a dense grid of light probes with a single volume that is refined where it matters. No inspector control is required — it activates automatically when APV is enabled in the scene.BRPNot applicable in the Built-in pipeline.
Override Scene Light:Ignores the scene's main light and uses custom values instead. Useful for making the material look consistent regardless of the world's lighting.Light Directionsets the direction the light comes from,Light Colortints the light,Light Intensitycontrols its brightness, andShadow Strengthsets the darkness of the shadowed areas.
Min Light Brightness / Max Light Brightness:Clamp the environment and light brightness, so models never become pitch black in dark rooms (Min Light Brightness) or overexposed in bright worlds (Max Light Brightness).
Shade Shift Map:A grayscale texture (with aUV Setselector andStrength) that biases the shadow threshold per-pixel, letting you fix clothing folds, muscle creases, and baked ambient occlusion that would otherwise be washed out by toon lighting.
Monochrome Lighting:Desaturates scene lighting color so accurate skin tones are preserved regardless of strongly colored world lighting.
As-Unlit Lighting:Blends lighting towards a uniform unlit floor in dark environments, keeping the character readable when scene light falls below useful levels.
OpenLit Harmony Mode:Switches the diffuse calculation to the OpenLit CC0 standard half-Lambert formula, so your avatar's lighting matches other OpenLit-based avatars (lilToon, Poiyomi) in photo and cross-avatar worlds.
VRC Light Volumes:Samples REDSIM's VRCLightVolumes v2 for per-pixel voxel ambient lighting in supported worlds, including their analytic point/spot/area lights. Falls back to standard light probes elsewhere; forced OFF in Medium/Low performance levels.
VRSL (VR Stage Lighting) GI:Receives the point and spot GI lights that VRSL worlds publish for their stage fixtures (from _Udon_VRSL_GI_LightTexture), with diffuse light and GGX highlights. Outside VRSL worlds it adds nothing. Features controls forGI Intensity, Direct Light Intensity, andSpecular Highlight Reception.
Light Layers:URPEvaluates fragment-level lighting masks matching Unity URP's Rendering Layers (Light Layers). Lights in URP only illuminate geometry whose Mesh Renderer shares at least one matching layer bit.BRPIn the Built-in pipeline, all lights illuminate all layers normally.
Toon Mode
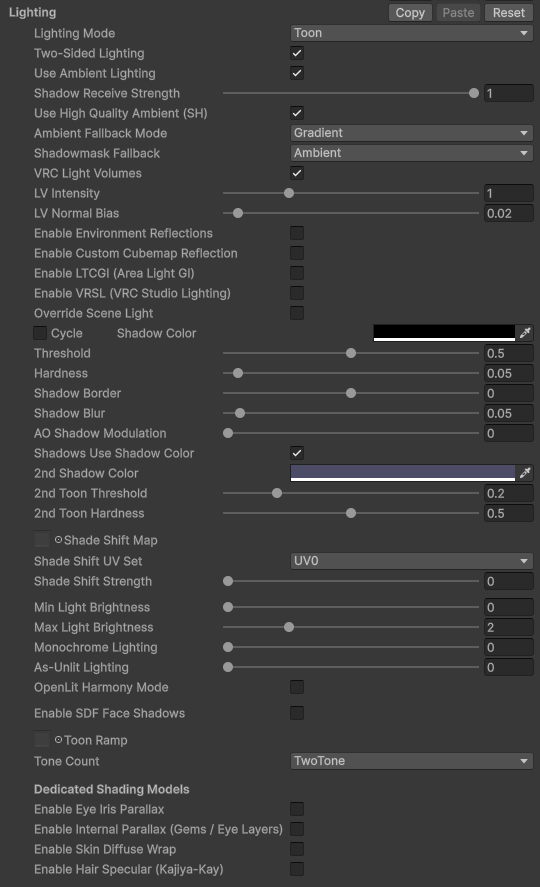
Lighting section in Toon mode.
Threshold/Hardness:Controls the size and sharpness of the shadow edge.
2nd Shadow Tier (Dual-Step Anime Cel Shadows):Adds a second, softer shadow layer beneath the first for multi-tone anime shading.2nd Shadow Colortints the intermediate shadow band,2nd Toon Thresholdplaces its boundary, and2nd Toon Hardnesscontrols how sharp its edge is.
Toon Ramp:An optional gradient texture (shadow on the left, light on the right) that defines the exact shading ramp. If no ramp is set, the shader uses flat tone bands instead.
Tone Count:The number of lighting bands when not using a ramp texture (TwoTone, ThreeTone, orFourTone).
Mid-Color / Mid Threshold:(3+ tones) The color and boundary of the midtone band.
Highlight Color / Highlight Threshold:(4 tones) The color and boundary of the brightest band.
Step Specular:Turns the specular highlight into a hard, cartoon-style step.Step Specular Thresholdplaces the highlight boundary andStep Specular Hardnesscontrols its edge sharpness.
Shadow Border:Offsets the Toon shadow line boundary, letting you grow or shrink the lit area without touching the threshold ramp.
Shadow Blur:Softens the Toon shadow step for smoother cel transitions.
AO Shadow Modulation:Uses the mesh's ambient occlusion map to push crevices and folds into shadow, grounding the cel shading.
Stylized PBR Mode
Normal Map/Strength:Adds surface detail using a normal map texture. TheNormal UV Setselector chooses between UV0 and UV1 for the normal map, andFlip Normal Map Yinverts the Green channel to convert between DirectX and OpenGL normal map formats.
Detail Normal System (1–4 Layers + Bicubic):Micro-surface detail normal stacking supporting up to 4 independently scrolled and scaled detail normal layers:
Bicubic Normal Filtering:5-tap Catmull-Rom bicubic spline filtering eliminating bilinear texel grid diamond artifacts at close inspection distances in VR.
Detail Layers (1 to 4):Dynamically enables independent layers 1 through 4 with individual strength scales, UV coordinate sets (UV0/UV1), and continuous UV scroll velocities.
Normal Blend Mode:Selects between standardWhiteout / UDNblending and high-fidelityReoriented Normal Mapping (RNM).
Detail Normal Distance Fade:Automatically attenuates high-frequency detail normal strength across distance to suppress shimmering and temporal aliasing in VR headsets.
Metallic/Smoothness:Controls the metal-like and shiny properties. These can be set with sliders or controlled by aMetallic/Gloss Map, where the Red channel controls metallic and the Alpha channel controls smoothness.
Workflow:Switches between theMetallicworkflow (Metallic/Smoothness sliders and Metallic/Gloss Map) and theSpecularworkflow, which uses aSpecular Colorand aSpecular Gloss Map(RGB = specular color, A = smoothness) instead.
Enable Clear Coat:Adds a transparent protective layer over the surface, like clear coat paint.Strengthcontrols how visible the coat is andRoughnesshow blurry its highlight is.Clear Coat settings.
Standard PBR Mode
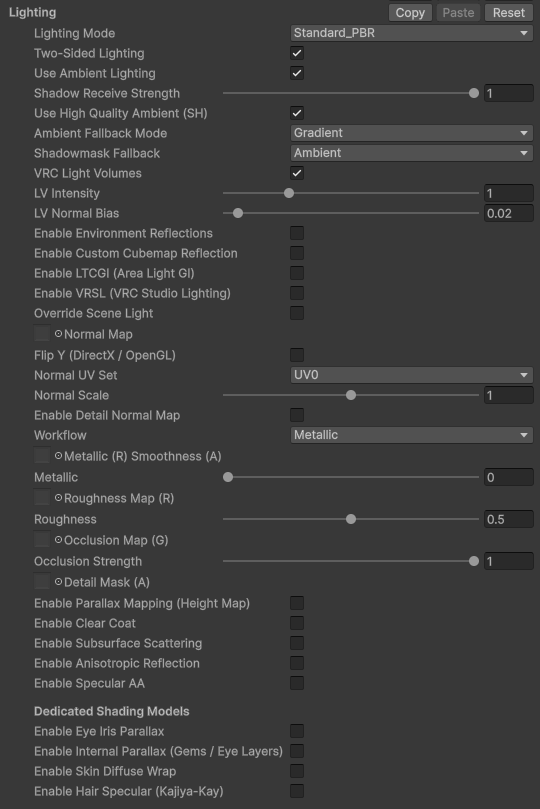
Lighting section in Standard PBR mode.
Normal Map/Strength:Adds surface detail using a normal map texture. TheNormal UV Setselector chooses between UV0 and UV1 for the normal map, andFlip Normal Map Yinverts the Green channel to convert between DirectX and OpenGL normal map formats.
Detail Normal System (1–4 Layers + Bicubic):Identical 4-layer detail normal chaining with bicubic Catmull-Rom reconstruction and RNM blending.
Metallic:Controls the metal-like properties of the surface.
Workflow:Switches between theMetallicworkflow and theSpecularworkflow, which uses aSpecular Colorand aSpecular Gloss Map(RGB = specular color, A = smoothness) instead of metallic.
Roughness Map/Roughness:Controls the roughness of the specular reflections. A higher roughness creates a broader, more blurry reflection. If no roughness map is set, it falls back to the inverse of the Metallic/Gloss Map's Alpha channel (smoothness).
Occlusion Map/Occlusion Strength:Simulates self-shadowing in crevices using an occlusion map.
Detail Mask:A mask texture to control where the secondary Detail Texture is applied.
Use High Quality Ambient (SH):Enables vertex-evaluated Spherical Harmonics ambient lighting for high-quality indirect diffuse light. When disabled, a fast sky-ground gradient fallback is used instead. Automatically supports lightmap sampling on static objects.
Enable Clear Coat:Adds a transparent protective layer over the surface, like clear coat paint.Strengthcontrols how visible the coat is andRoughnesshow blurry its highlight is.
Subsurface Scattering (SSS)
Simulates light passing through and scattering within thin or translucent objects, like skin, wax, or leaves. This adds a soft, glowing look from behind the object.
Enable Subsurface Scattering:Toggles the effect on or off.Available in both Stylized PBR and Standard PBR modes.Subsurface Scattering settings.
SSS Model:Classic(the default) is the cheapest look: a blend towards the tint that does not depend on the lights, so it glows slightly in the dark.Litlights the tint with every light using a soft wrap-around falloff set by SSS Radius, following each light's colour and fading to nothing without light.
SSS Scale:The overall strength of the SSS effect.
SSS Radius:Controls how far light scatters within the material. Larger values create a softer, more diffuse look.
SSS Tint:The color tint applied to the scattered light.
Enable Thickness Map:Uses a grayscale texture to control how much light passes through different areas, simulating thin parts (ears, leaves, fabric) glowing more.Thickness Strengthscales the effect.
Anisotropic Reflection
Creates stretched or elongated specular highlights, common on surfaces with a grain or direction, like brushed metal, hair, or vinyl records, with full stereo stability and comfort across VR headsets.
Enable Anisotropic Reflection:Toggles the effect on or off.
Mode:Switches betweenWard(a general model) andStretched-Blinn(which uses a Tangent Map for more precise control).
Roughness U / V:Controls the roughness (and thus the highlight size) independently along two perpendicular directions (U and V). The difference between these values creates the stretching.
Specular Strength:The overall brightness of the anisotropic highlight.
Tangent Map:(Stretched-Blinn mode only) An optional texture map that defines the direction of the surface grain, giving precise control over the highlight's orientation.
Dedicated Shading Models
Specialized shading models for organic surfaces. These apply regardless of the selected lighting mode.
Enable Eye Iris Parallax:Simulates the depth and refraction of a pupil and iris beneath a transparent cornea.Iris UV Tilingscales the iris texture,Iris Depth Offsetcontrols the simulated refraction depth, andPupil Scalecontrols the size of the pupil.
Enable Internal Parallax (Gems / Eye Layers):Simulates layered interior depth beneath glass, lenses, crystals, and anime irises by ray-offsetting a texture in tangent space across multiple sample steps, creating believable "thickness" under a transparent surface.Internal Layer Textureis the interior depth texture (with its own tiling/offset),Layer Colortints the interior layer and supports the global color-shift timeline,Depth Scalecontrols how deep the simulated interior sits,Sample Stepssets how many layers of light are traced through it (1–10),Layer Strengthscales the layer's opacity, andEmissive Boostadds an internal glow to make the interior surface appear self-lit.
Enable Skin Diffuse Wrap:Softens the lighting on curved organic surfaces by wrapping light around the shadow terminator, reducing harsh shadow lines.Wrap Amountcontrols how much light wraps around.
Enable Hair Specular (Kajiya-Kay):Adds anisotropic highlights styled specifically for hair strands, producing bright streaks aligned with the hair direction.Specular Colortints the highlights,Primary/Secondary Exponentcontrol the sharpness of the two highlight streaks,Specular Strengthcontrols brightness, andSpecular Shiftmoves the highlights along the hair direction.
SDF Face Shadows
Clean, stable anime face shadows using a Signed Distance Field map instead of geometric normals — the standard technique for preventing messy shadow artifacts on stylized faces as the light direction changes.
Enable SDF Face Shadows:Master toggle.
Face Shadow Map (SDF):The SDF face shadow texture encoding light threshold gradients (the same maps used by other anime shaders).
Face Shadow Offset:Offsets the front/back shadow threshold angle.
Face Shadow Softness:Softens the SDF shadow edge boundary.
Invert Face Shadow:Inverts the SDF shadow gradient for maps authored with opposite conventions.
Geometric Specular Anti-Aliasing
Reduces specular shimmer, flickering, and firefly artifacts on dense meshes and detailed normal maps. This is especially valuable in VR headsets where high-frequency specular highlights cause distracting visual noise. Based on the Kaplanyan 2016 technique used in AAA game engines.
Geometric Specular AA:Master toggle to enable the effect.
Variance:Controls how aggressively the specular lobe is widened based on screen-space normal variation. Higher values produce smoother specular but may lose fine detail. Default:0.15.
Threshold:Caps the maximum roughness adjustment to prevent over-blurring on extremely dense geometry. Default:0.2.
This control only appears when the Lighting Mode is set toStylized PBRorStandard PBR. It has zero cost when disabled.
Surface Style
Defines the fundamental appearance of the surface, often overriding standard lighting. Only one style can be active at a time.
Crystal
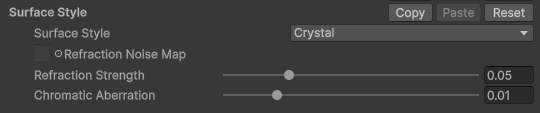
Simulates a refractive, crystalline material. It distorts the view of the texture behind it and can add chromatic aberration for a more stylized look. This effect works best with a base texture enabled.
Surface Style set to Crystal.
Refraction Noise Map:A noise texture used to control the pattern of the distortion.
Refraction Strength:Controls how strongly the texture is distorted.
Chromatic Aberration:Simulates color separation by offsetting the red and blue color channels, creating colored fringes at the edges of the distortion.
Galaxy
Renders a texture that appears to have depth and moves independently of the object's rotation, creating a "window into space" effect. This style disables standard scene lighting.
Galaxy Map:The texture to display inside the object.
Depth:Creates a 2D parallax effect based on view angle, making the texture appear to have depth.
Rotation Speed:Rotates the galaxy texture over time.
Skybox
Reflects a cubemap from the inside of the object, making it look like a portal or a window into another environment. This style disables standard scene lighting.
Skybox Cubemap:The cubemap texture to display.
Rotation Speed:Rotates the reflected skybox around the vertical axis over time.
Tri-Planar Mapping
Projects a texture onto the model from the top, front, and side, then blends them together. This is an effective way to texture complex models without needing perfect UV maps, as it avoids stretching and seams.
Tri-Planar Texture:The texture to project onto the model.
Scale:Controls the size (tiling) of the projected texture.
Blend Sharpness:Controls how sharply the textures from the three different projections blend into one another. Higher values create a harder edge.
MatCap (Material Capture)
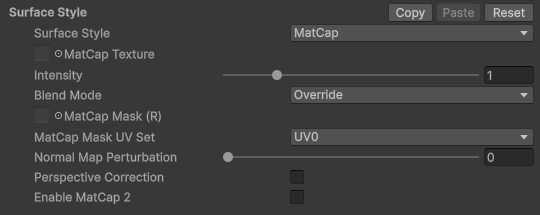
A lighting technique that uses a special "material capture" texture to define an object's complete lighting and reflection information. It's a very fast way to get complex, stylized lighting effects. This style disables standard scene lighting.
Surface Style set to MatCap.
MatCap Texture:The texture that defines the object's appearance. It's typically a sphere rendered with the desired lighting.
Intensity:A multiplier to control the brightness of the MatCap effect.
Blend Mode:How the MatCap combines with the material's base color.Overridefully replaces it,Multiplytints it,Additivebrightens it, andScreengives a softer brightening.
MatCap Mask (R):An optional texture whose Red channel restricts where the MatCap is visible. White areas show the MatCap, black areas fall back to the base color. ItsUV Setselector picks between UV0 and UV1.
MatCap 2 (Secondary Layer)
A second, independently controlled MatCap layer blended on top of the first for multi-layer material capture looks (e.g. a stylized base layer plus a glossy rim layer).
Enable MatCap 2:Toggles the secondary MatCap layer.
MatCap 2 Texture / Intensity / Blend Mode:The same controls as the primary MatCap (blend modes:Add, Multiply, Replace, Lighten, Overlay).
MatCap 2 Mask (R):An optional texture whose Red channel restricts where the second layer is visible, with its ownUV Setselector.
MatCap Normal Perturbation:How strongly the surface normal map perturbs the MatCap sampling direction, letting baked normal detail affect the captured lighting.
MatCap Perspective Correction:When enabled, corrects the MatCap UVs for per-view perspective so the capture stays stable when viewed from an angle, improving VR comfort.
Iridescence
Creates a rainbow-like effect where the color shifts based on the viewing angle, similar to a soap bubble or an oil slick. This effect is blended over the existing surface color and lighting.
Surface Style set to Iridescence.
Color Scale:Controls the frequency of the color shifting across the surface. Higher values create more, tighter rainbow bands.
Strength:Controls how strongly the iridescent color is blended with the base color.
Glitter
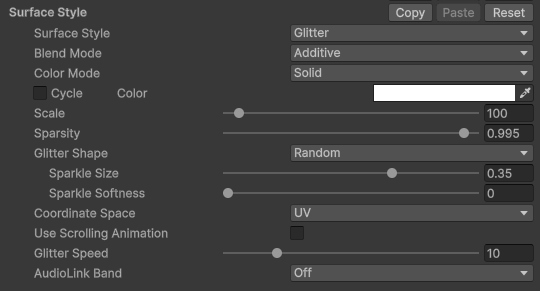
Adds an animated, sparkling glitter effect to the surface. This effect is applied after lighting.
Surface Style set to Glitter.
Blend Mode:Controls how the glitter is blended with the underlying surface color.Additivecan get very bright.Lerpreplaces the base color (emissive).Maxensures it's never darker than the glitter color.
Color Mode:Selects how sparkle colors are generated:Solid(single color with hue shift),Two Color Ramp(independent per-sparkle blend between Color 1 and Color 2),Rainbow(continuous spectrum cycle),Gradient Texture(samples a color ramp texture),AudioLink Theme(tinted by venue theme palette), orAudioLink Chord(ColorChord musical note colors). Multi-color and AudioLink modes evaluate independent colors per sparkle and render with true hue vibrance.
Color:The primary color of the glitter sparkles. Can be animated with "Animate Hue". (Displayed when Solid or Two Color Ramp is selected).
Color 2:Secondary color for two-color variation when using Two Color Ramp mode.
Scale:Controls the size of the glitter noise pattern. Higher values mean smaller, finer sparkles.
Sparsity:Controls how many sparkles appear. Higher values mean fewer, more sparse sparkles.
Shape:Selects the sparkle shape:Random(organic, rounded noise sparkles),Circle, Square, orStar.
Sparkle / Shape Size & Softness:Tunes the sparkle footprint (0.05–0.5) and anti-aliased edge falloff (0 = sharp edge, >0 = smooth fade into transparent) across both Random sparkles and geometric shapes.
Use Screen Space:Bases the glitter pattern on screen coordinates instead of the model's UVs. This makes the glitter appear to "swim" across the surface as the camera or object moves.
Use Scrolling Animation:Smoothly scrolls the glitter pattern across the surface so sparkles stay crisp, dense, and naturally animated while in motion.
Scroll Direction:2D directional steering vector controlling the direction of the scrolling glitter.
Twinkle Speed / Scroll Speed:Independent speed controls: Twinkle Speed drives sparkle twinkling and popping, while Scroll Speed controls how fast the pattern travels across the surface.
Psychedelic
Applies domain-warped fractal Brownian motion (FBM) noise that creates flowing, organic color patterns. The effect is linked to the Global Color Shift timeline for synchronized color animation.
Coordinate Space:Controls whether the pattern uses world space, screen space, or UV coordinates.
Hue Shift Scale:Multiplier for how strongly the psychedelic pattern shifts colors.
Flow Speed:Speed at which the psychedelic noise flows across the surface.
3D Fractal
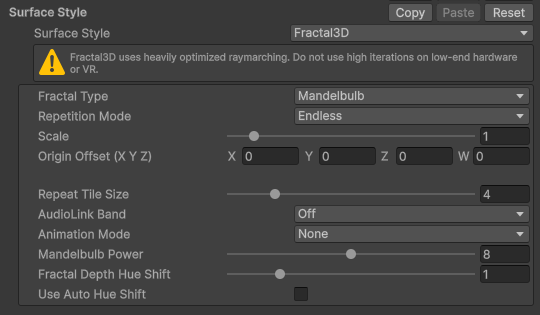
Renders a volumetric fractal using raymarching techniques. This creates complex, infinite 3D structures that appear to extend infinitely into the object. This style disables standard scene lighting and uses a custom raymarching renderer.
Surface Style set to 3D Fractal.
Performance Warning:3D Fractal uses computationally intensive raymarching. Use low iteration counts (4-8) on mobile/VR platforms. Higher iterations can cause significant frame rate drops.
Fractal Types
Mandelbulb:The 3D extension of the Mandelbrot set. Creates bulbous, organic shapes with variable power parameter.
Menger Sponge:A 3D fractal based on repeatedly removing cubes from a larger cube. Creates intricate, sponge-like structures.
Kaleidoscopic IFS:Iterated Function System with kaleidoscopic symmetry. Creates complex, mirrored patterns.
Mandelbox:A fractal based on box folding and sphere folding operations. Creates blocky, crystalline structures.
Julia Set 3D:A complex number extension of the Julia set in 3D space with coupling between dimensions.
Sierpinski Tetrahedron:The 3D Sierpinski fractal based on tetrahedron subdivision.
Apollonian Gasket:A fractal based on mutually tangent circles/spheres.
Burning Ship:A variation of the Mandelbrot set using absolute values, creating "ship-like" structures.
Tricorn:The conjugate of the Mandelbrot set, creating different symmetry patterns.
Mandelbulb Power 2:Standard Mandelbulb with fixed power of 2 and higher iteration count.
Mandelbulb Power 8:Mandelbulb with fixed power of 8, creating more detailed, spiky structures.
Quaternion Julia:A true 4D quaternion Julia set for mathematically correct quaternion fractals.
IFS Tetrahedron:Iterated Function System based on tetrahedron vertices.
Octahedron:Platonic solid fractal based on octahedron symmetry.
Dodecahedron:Platonic solid fractal based on dodecahedron symmetry with golden ratio proportions.
Icosahedron:Platonic solid fractal based on icosahedron symmetry with golden ratio reflections.
Cubic Fractal:Simple fractal based on repeated cube subdivision.
Hybrid Box-Bulb:Combination of Mandelbox and Mandelbulb techniques for unique hybrid structures.
Core Properties
Fractal Type:Selects which fractal algorithm to use from the list above.
Repetition Mode:Controls how the fractal repeats in space.
Single Instance:One fractal object, fastest performance.
Repeated (Clipped):Fractal repeats in a grid but is clipped to prevent infinite computation.
Endless:True infinite fractal, most computationally expensive.
Scale:Controls the overall size of the fractal structure.
Fractal Offset:3D vector offset to reposition the fractal center within the object's coordinate space.
Fractal Repeat Size:Sets the spatial repetition period and boundary grid size when Repetition Mode is set to Repeated or Endless.
Animation Mode:How the fractal animates over time.
None:Static fractal.
Yaw:Rotates around the Y-axis.
Pitch:Rotates around the X-axis.
Roll:Rotates around the Z-axis.
Tumble:Complex rotation combining multiple axes.
Sway:Gentle oscillating motion.
Pulsate:The fractal appears to inflate and deflate.
Animation Speed:Controls how fast the chosen animation plays.
Fractal-Specific Properties
These properties change based on the selected fractal type:
Mandelbulb Power:Controls the power parameter (typically 2-8) for bulb-like fractals.
Iterations:Number of fractal iterations. Higher values = more detail but slower performance. Most fractals work well with 4-12 iterations.
Box Scale (Mandelbox):Scale factor for box folding operations. Negative values (-2 to -1.5) create interesting visuals.
Hybrid Scale (Hybrid Box-Bulb):Scale factor for the hybrid fractal. Try values between 1.5 and 3.0.
Angles (Kaleidoscopic IFS):Rotation angles for the kaleidoscopic IFS symmetry.
Julia C Constant:The complex/quaternion constant that defines the Julia set shape. Try small values like (-0.2, 0.6, 0.2, 0.2) and animate for morphing effects.
Color Properties
Fractal Depth Hue Shift:Shifts colors based on raymarching depth for rainbow effects.
Auto Hue Shift:Automatically animates the color shifting over time.
Auto Shift Speed:Speed of the automatic color animation.
Overlays
These effects are drawn on top of the base surface.
Grid
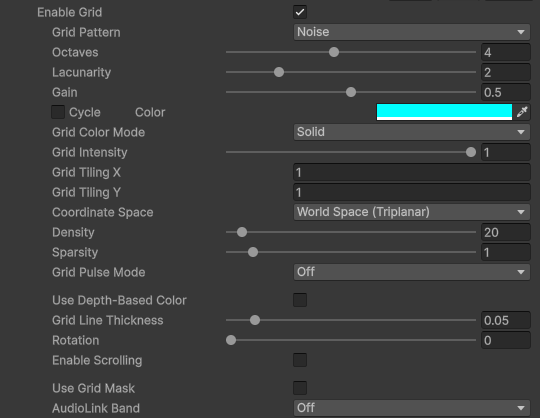
Overlays a procedural geometric pattern on the surface. This is a powerful feature for creating sci-fi, holographic, or abstract visuals. It has many properties to customize its appearance and animation.
Grid overlay settings.
Core Properties
Pattern:Selects the geometric pattern from the list below. Each pattern may have unique behaviors or properties. The pattern library is shared with the Procedural Texture feature.
Color Mode:Selects how grid colors are styled:Solid(single color with hue shift),Rainbow(continuous spectral cycle),AudioLink Theme(tinted by the world's active AudioLink theme palette), orAudioLink Chord(ColorChord musical note colors).
Color:The color and transparency of the grid pattern. Can be hue-shifted.
Intensity:Master opacity and brightness multiplier for the grid overlay (0–2).
Coordinate Space:A projection selector that maps the pattern onto the model:UVsticks to the surface,World Space (Triplanar)makes it appear to "swim" over the surface as the object moves, and additional local, screen, planar, spherical, cylindrical, and biplanar projections are available.
Grid Tiling X/Y:Independent horizontal and vertical tiling multipliers for the pattern.
Density:Controls the tiling or frequency of the pattern. Higher values mean a denser pattern.
Sparsity:Controls the spacing between pattern elements. Higher values increase the spacing.
Thickness / Size / Fill:This property's function changes based on the selected pattern. It can control line thickness, dot radius, or the fill amount for certain patterns.
Rotation:Rotates the entire grid pattern.
Use Fill Style:For patterns like Squares, Triangles, and Hexagons, this toggles between an outline and a filled shape. For fractal patterns, it can have a more complex effect on the final look.
Pattern Descriptions
Noise:A smooth value noise pattern with Octaves, Lacunarity, and Gain controls.
Voronoi:An organic, cell-like pattern with a selectable style (Distance, Color, Edges). Can be animated to morph over time.
Stripes:Parallel lines that can be animated or static.
Dots:A grid of circles. TheThicknessproperty controls their radius.
Checkerboard:A standard checkerboard pattern. This is a binary fill pattern (Thickness does not apply).
Bricks:A classic running-bond brick pattern.
Hexagons:A honeycomb pattern of hexagonal shapes. Can be outlines or filled.
Squares, Triangles:Classic tessellating geometric shapes. Can be outlines or filled.
Chevrons:A pattern of V-shapes.
Crosshatch:Intersecting diagonal lines. Can be outlines or filled diamonds.
Barcode:Vertical bars of varying widths.
Polka Dot Scallop:Overlapping semi-circles in a polka dot arrangement. TheThicknessproperty controls dot size.
Rounded Squares:Squares with rounded corners.
Woven:A pattern that resembles a woven basket or chain-link fence.
Plaid:Intersecting lines of different thicknesses, creating a plaid or tartan look.
Houndstooth:A classic checker pattern with broken checks.
Argyle:A diamond pattern with overlapping circles.
Scales:A pattern of overlapping semi-circles, like fish scales.
Diagonal Stripes:A simple pattern of diagonal lines.
Herringbone:A pattern of interlocking V-shapes, common in flooring and textiles.
Sierpinski:The Sierpinski Carpet fractal. This is a fill-only pattern (Thickness does not apply).
Box Fractal:A fractal pattern based on repeating squares. Has its ownUse Fill Styletoggle.
Truchet Tiles:A pattern of quarter-circle arcs with random orientations, creating complex, maze-like visuals.
Truchet Lines:Connected line segments in a maze-like pattern.
Spirals:Archimedean spirals emanating from the center of the coordinate space.
Radar:Concentric circles and radial spokes, like a classic radar screen.
Sine Waves:A pattern of horizontal sine waves.
Cross Fractal:A fractal based on repeating crosses.
Mandelbox:A 2D slice of the 3D Mandelbox fractal, creating intricate blocky structures. Has its ownUse Fill Styletoggle.
Animation
Pulse Mode:Animates the grid.Intensitypulses the grid's transparency between a defined min/max range.Colorpulses the grid's color towards its hue-shifted variant.
Enable Scrolling:Animates the grid by scrolling it across the surface. For radial patterns like Spirals and Radar, this controls radial (in/out) and angular (spin) motion.
Depth-Based Color
WhenUse Depth-Based Coloris enabled, the grid will change its color when it gets close to another object's surface. This requires scene depth information and may not work with all rendering setups.Depth Colorsets the target color, andDepth Rangecontrols the distance of the effect.
Grid Mask
Allows you to use a texture to mask the grid effect, controlling where it appears on your model. This is useful for restricting the pattern to specific areas without needing to create separate materials.
Use Grid Mask:Toggles the masking feature on or off.
Grid Mask:The texture used to mask the grid. The grid pattern will only appear where this texture is white (based on the red channel).
Invert Mask:Inverts the mask, so the grid pattern appears where the mask texture is black.
Detail Texture
Blends a secondary texture over the base material. This is a powerful way to add high-frequency detail, like fabric weaves, scratches, or grunge, without needing a high-resolution base texture.
Detail Texture:The secondary texture to overlay. It's often a small, tileable grayscale texture.
Blend Mode:How the detail texture combines with the base color:Overlay, Multiply, Additive, orSoft Light.
Intensity:How strongly the detail texture is blended with the base material.
Scanlines
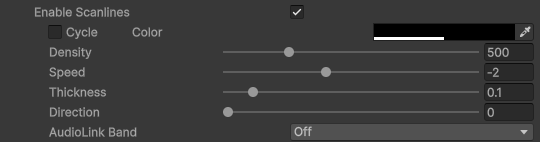
Simulates the look of a retro CRT monitor by overlaying a pattern of dark, scrolling lines. This screen-space effect is great for holographic displays, computer terminals, or retro-futuristic aesthetics.
Scanlines settings.
Color:The color and transparency of the scanlines. Typically black with some transparency.
Density:How many scanlines appear on screen.
Speed:How fast the scanlines scroll.
Thickness:The thickness of the scanlines.
Direction:The direction of the scanlines (Vertical or Horizontal).
Interlacing
A simple but effective screen-space effect that darkens every other horizontal row of pixels on the screen. This mimics the look of old interlaced video signals, adding a subtle retro or lo-fi quality to the material.
Intensity:How dark the interlaced lines are. A value of 1 will make them completely black.
Noise/Grain
Adds a layer of animated noise over the final color, similar to film grain or digital sensor noise. This screen-space effect can be used to add texture, break up smooth gradients, or enhance a lo-fi or cinematic aesthetic. The animation is stepped, not smooth, to better simulate digital noise.
Color:The color of the noise particles. Can be a solid color or hue-shifted.
Intensity:The strength of the noise effect.
Animation Speed:The 'frames per second' of the noise animation. Lower values look like slow-updating static, while higher values resemble fast film grain.
Wetness
Simulates a wet surface by darkening the material, boosting its smoothness, and optionally adding animated rain ripples. Great for rainy scenes, recently drenched props, or watery creatures.
Wetness Strength:The overall intensity of the wet look.
Rain Ripple Map:A normal map used for the rain ripple animation. The ripples use the map's normal data to distort reflections.
Ripple Scale:The size of the rain ripple pattern.
Ripple Speed:How fast the ripples animate.
Decal
Overlays up to three independent textures onto the surface like stickers or painted emblems, without needing a separate decal projection setup. Each decal layer has its own texture, UV set, blend mode, strength, and rotation, and can be enabled or disabled individually.
Enable Decal 1/2/3:Toggles each decal layer on or off.
Decal Texture:The texture to overlay. Use its Tiling/Offset to position it.
Decal UV Set:Selects the coordinate channel (UV0 or UV1) for the decal.
Blend Mode:How the decal blends with the base color (Alpha Blend, Multiply, Additive, Lighten, orOverlay).
Strength:The overall opacity/strength of the decal.
Rotation:Rotates the decal around the center of the UV space (0–360 degrees).
AudioLink Band / Strength:Each decal has an AudioLink band selector and strength multiplier, letting the decal pulse or fade with the music (e.g. a beat-synced logo or muzzle flash).
PBR Decals
Each of the shader's three decal layers now supports PBR (Physically Based Rendering) overrides. When enabled, a decal can modify the surface's normal map, metallic, and smoothness values in addition to its base color — allowing physically accurate decals like metallic bolts, bumped scars, leather patches, or glossy stickers.
Affects PBR:Per-decal toggle that enables the PBR properties below.
Decal Normal Map:A tangent-space normal map applied in the decal's UV region. Blended with the surface normal using the decal's alpha as the blend factor.
Normal Strength:Controls the intensity of the decal's normal map (range: 0–2).
Metallic:Overrides the surface metallic value within the decal region (range: 0–1).
Smoothness:Overrides the surface smoothness within the decal region (range: 0–1).
The PBR overrides are blended using the decal texture's alpha channel multiplied by the decal strength, so they naturally fade at the decal's edges. This feature is available on all three decal layers independently.
Hologram
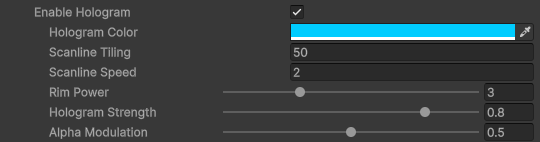
Simulates a sci-fi holographic projection with animated scanlines, a glowing edge rim, and subtle flicker. It is layered over the existing surface color and lighting, making it ideal for projected displays, force-field emitters, and holographic avatars.
Hologram settings.
Hologram Color:The color tint of the hologram projection. Can be hue-shifted.
Scanline Tiling:The density of the horizontal hologram scanlines.
Scanline Speed:How fast the scanlines sweep across the surface.
Rim Power:The falloff sharpness of the hologram's edge glow.
Hologram Strength:How strongly the hologram blends over the base surface.
Alpha Modulation:Modulates the material's transparency with the scanline pattern, adding a flickering, translucent quality.
Effects
A collection of miscellaneous visual effects.
Rim Glow
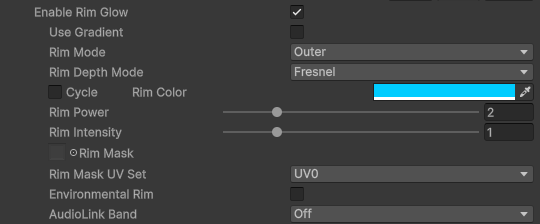
Adds a glow to the edges of the object based on the viewing angle (a Fresnel effect). This is great for highlighting silhouettes.
Rim Glow settings.
Use Gradient:If enabled, uses a gradient texture to color the rim glow instead of a solid color.
Color / Gradient:The color or texture ramp for the rim glow.
Power:Controls the falloff of the rim effect. Higher values create a tighter, sharper rim.
Intensity:The brightness of the rim glow.
Rim Mode:Switches betweenOuter(glow on the outer silhouette edge) andInner(inverted, glowing toward the interior).
Rim Depth Mode:Switches the rim response betweenFresnel(based on viewing angle) andDepth(based on scene depth, highlighting where the object is close to other geometry).Rim Depth Widthcontrols the width of the depth-based rim band. Depth mode requires scene depth information.
Environmental Rim:Tints and modulates the rim glow using ambient spherical harmonics and reflection probes, so the rim reacts to the surrounding environment instead of a fixed color.
Intersection Effect
Creates a visual effect where the material's surface interacts with other objects in the world. This is ideal for force fields, liquid surfaces, or soft proximity indicators. This effect requires the material's Render Mode to be set to Transparent or Additive.
Mode:Selects the effect's behavior.Colorfades to a specified color at the intersection point.Alphafades out the object's transparency at the intersection point, creating a soft blend.
Color:The color that appears at the point of intersection (only in Color mode).
Distance:The distance from an intersection over which the effect will fade in.
Pulse
Adds a pulsing animation to the material's emission strength, creating a "heartbeat" effect.
Speed:How fast the emission pulses.
Intensity:How bright the pulse is.
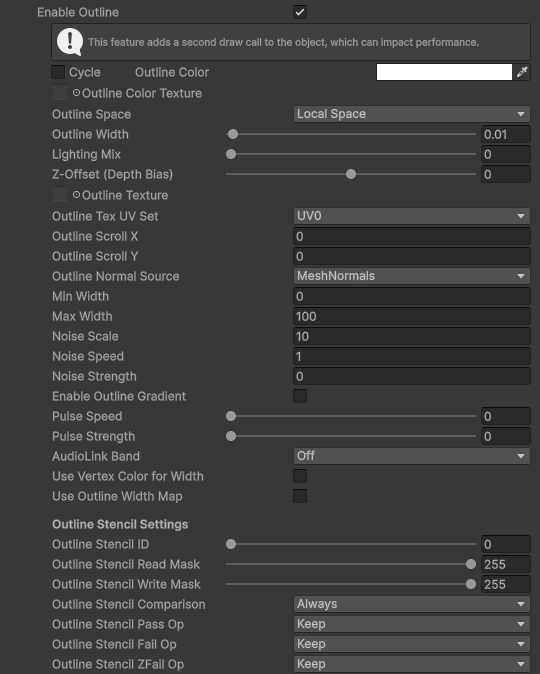
Outline
Renders a solid outline around the object. The outline will be correctly hidden by effects like Dissolve and Clipping Mask.
Outline settings.
Performance Impact: Outlines can be expensive as they require an additional rendering pass.
Color:The color of the outline.
Outline Space:Chooses between Screen Space (constant screen pixel width), Local Space (scales with both distance and object scale), and World Space (scales with distance, independent of object scale).
Width:The width of the outline.
Use Vertex Color for Width:Uses the mesh's vertex colors (Red channel) to control the outline width, allowing for artistic variation.
Outline Min Width / Max Width:Clamp the outline width so it never grows pastMax Widthat close range or shrinks belowMin Widthin the distance, preventing outlines from overwhelming or disappearing at different camera distances.
Outline Normal Source:Selects which vertex stream supplies the smoothed normals used to push the outline out:Mesh Normals, Vertex Colors, UV2, orUV3. Picking a baked vertex stream (Vertex Colors / UV2 / UV3) eliminates the split-normal seams common on low-poly meshes.
Outline Noise Scale / Speed / Strength:Applies an animated noise jitter to the outline vertices for a lively, hand-drawn or burning edge effect.Scalesets the noise frequency,Speedits animation rate, andStrengthhow far the vertices jitter.
Outline Pulse Speed / Strength:Makes the outline "breathe" by oscillating its width over time.Pulse Speedsets the oscillation rate andPulse Strengthsets the amplitude of the pulsing.
Lighting Mix / Lighting Source:Lighting Mix blends scene lighting onto the outline (0 = unlit, 1 = fully lit). Lighting Source picks the lights:All Lightsuses ambient plus the main and additional lights (Built-in: the main directional light and vertex lights), without shadows;Ambient Onlyuses just the ambient light probes.
Z-Offset (Depth Bias):Positive values pull the outline towards the camera, negative push it away, the same on every graphics API. Use it to stop outlines clipping into or showing through nearby geometry.
Outline Texture & Gradient
Outline Texture:An optional texture that tints and modulates the outline color. ItsUV Setselector picks between UV0 and UV1, andScroll Speed X/Yscroll the texture across the outline.
Enable Outline Gradient:Tints the outline from aGradient Top Colorto aGradient Bottom Colorbased on the vertical position on the object, for a two-tone gradient outline.
Outline Stencil Buffer Controls
Allows independent stencil testing and writing specifically during the inverted-hull outline pass. This is crucial for preventing outlines from overlapping or dirtying inner face meshes, hair strands, or layered clothing.
Stencil Ref:The reference stencil value for the outline pass (0–255).
Read / Write Mask:Bitmasks controlling which bits of the stencil buffer the outline pass reads or writes.
Comparison (Comp):Stencil comparison function against the current buffer (e.g.NotEqualto skip drawing outlines over interior surfaces stamped with matching stencil IDs).
Pass / Fail / ZFail:Stencil buffer operations performed on pass, test failure, or depth test failure.
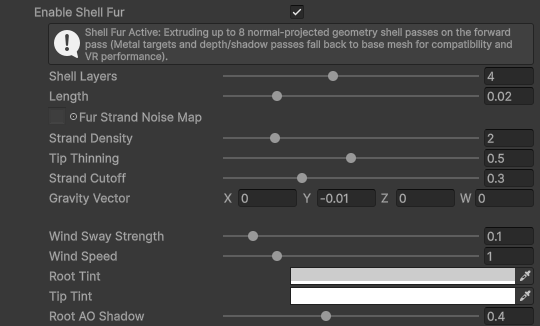
Shell Fur Extrusion
Available when using the FireRat/FireRatShader_FurBRP or FireRat/FireRatShader_URP_FurURP master shader variants. Extrudes up to 16 concentric shell layers along vertex normals to render volumetric fur, velvet, and plush textures.
Shell Fur settings on the Fur shader.
Shell Layers:Number of shell layers drawn (1 to 16). More layers give smoother, fuller fur but draw the surface once more per layer; layers above the count draw nothing.
Length:Physical extrusion distance of the fur strands in object/world units (up to 0.25).
Fur Mask Texture:Optional strand mask controlling where strands grow. Without one, built-in procedural strands are used: round, tapering towards the tip and of random length, fading to a fine stable dither when smaller than a pixel.
Density:Tiling frequency of the fur strand noise pattern.
Tip Thinning:Progressively sharpens strand alpha thresholds toward outer shell layers.
Gravity Vector:Direction and magnitude of physical gravity pulling fur tips downward.
Root & Tip Colors:Two-tone vertical color gradient from strand base to outer tip.
Root AO Shadowing:Simulates ambient occlusion darkening at the base of the fur coat.
Ripple Effect
Creates a concentric ripple effect that distorts vertices and color, emanating from a point in the object's UV space.
Center (UV):The origin of the ripples in UV space (X,Y).
Ripple Count:The number of concentric ripple rings.
Fadeout Radius:The distance from the center at which the ripples fade out completely.
Width:The width of each individual ripple ring.
Color Mode:Selects how ripple rings are styled:Solid(single color with hue shift),Rainbow(continuous spectral cycle),AudioLink Theme(tinted by active venue palette), orAudioLink Chord(ColorChord musical note colors).
Color:The color of the ripples.
Strength:The brightness of the ripple color.
AudioLink Target:Selects which ripple parameter AudioLink modulates:Strength, Radius, orSpeed.
Distortion Strength:How much the ripple displaces the model's vertices along their normals.
Progress / Animate:Manually control or automatically animate the ripple's phase.
Vertex Animation Texture (VAT)
Applies pre-baked vertex animation from a texture instead of a Skinned Mesh Renderer. Each row of the texture is a frame of the animation. Useful for pre-baked cloth, fluids, destruction, or any heavily animated mesh that needs to stay performant.
Position Texture:The VAT texture containing the position offsets. Each row is a frame.
Frame Count:The total number of animation frames in the texture.
Speed:The playback speed of the vertex animation.
Bounds Min / Bounds Max:The bounds used to remap the packed vertex positions back to world space. These must match the bounds used when baking the animation.
PS1 Retro Vertex Snapping
Quantizes vertex positions to a coarse grid to emulate the classic wobbly PlayStation 1 aesthetic. Great for retro-styled avatars and worlds, especially combined with pixelation and affine-style textures.
Dynamically rotates mesh vertices so the object always faces the active camera — useful for sprites, eye highlights, floating companions, and particles that should never be seen edge-on. Applied consistently in shadow, depth, and motion-vector passes.
Enable LookAt Billboarding:Master toggle.
Mode:Full 3Dfaces all axes toward the camera;Y-Axis Onlyrotates horizontally while staying upright.
Strength:Blends between normal orientation and full billboarding (0–1).
Screen-Space Refraction
URP Only Provides true screen-space refraction for glass, water, and crystal-like materials by sampling the camera's opaque texture with UV offsets derived from the surface normal. This creates realistic distortion of the background scene visible through transparent geometry.
Screen Refraction:Master toggle to enable the effect.
Refraction Strength:Controls the intensity of the UV distortion (range: 0–1). Higher values produce more pronounced refraction.
Index of Refraction (IOR):The refractive index of the simulated material (range: 1.0–2.0). Water is approximately1.33, glass is approximately1.5.
URP Only:This feature uses URP's_CameraOpaqueTextureand is not available in the Built-in Render Pipeline. The BRP variant has the properties for material compatibility but the effect is a no-op. Ensure "Opaque Texture" is enabled in your URP Renderer Settings.
Emission Pulse
Animates the emission intensity over time using various waveform patterns, creating pulsing, breathing, or flashing glow effects without requiring any animation controllers or scripts.
Emission Pulse:Master toggle to enable pulsing emission.
Pulse Speed:The frequency of the pulse animation.
Pulse Min / Max:The range of emission intensity to pulse between.
Pulse Mode:Selects the waveform shape:Sine(smooth),Square(on/off),Triangle(linear ramp),Sawtooth(ramp up, snap down).
Outline Width Map
Allows per-vertex control over the outline thickness using a texture map. This enables artistic effects like thicker outlines on silhouette edges and thinner outlines on interior details.
Outline Width Map:A grayscale texture where white = full outline width and black = zero outline width. Multiplied with the global Outline Width value.
This control appears within the Outline settings when Outline is enabled.
Glitches
Effects designed to create digital distortion and glitch aesthetics.
Vertex Distortion
Displaces the model's vertices in various patterns to create a glitchy shape animation. Each mode has unique properties for Strength, Speed, and other controls.
Glitches section with Vertex Distortion enabled.
Sine X/Z:Creates a sine wave that travels along an axis.
Ripple:Creates a circular ripple emanating from the object's center.
Noise:Randomly displaces vertices for a chaotic, noisy look.
Swirl/Twist:Rotates vertices around the object's Y-axis.
Texture:Displaces vertices based on the R/G channels of a texture map.
Stretch/Pulse/Inflate:Scales the model along an axis or uniformly.
Shear:Skews the model along an axis.
Wind:Simulates a gentle, wave-like wind blowing across the surface.
Wobble/Vortex:Creates more complex, chaotic motions.
Flap/Butterfly Flap:Creates a wing-flapping motion, with options to pivot from UV edges for precise control.
Strength:How far the vertices are displaced.
Speed:The speed of the distortion animation.
Glitch Flicker
Applies a flickering effect to the material's color using different patterns. Strength controls how dark the flicker gets.
Glitch Flicker settings.
Random/Pulse:Simple flickering patterns.
Scanlines:A dark line that scrolls across the screen.
Blocky:Divides the screen into blocks that flicker randomly.
Channel Shift:Causes individual R, G, or B color channels to flicker out.
Interference:Simulates horizontal interference lines, like a bad TV signal.
Signal Loss:Occasionally replaces the image with digital static.
Speed:The speed of the flicker.
Intensity:The strength of the flicker (how dark it gets).
Scanline Mode Extras:When theScanlinesmode is selected, additional controls appear:Reverse Scrollreverses the scanline direction,Directionswitches between vertical and horizontal lines,Densitysets how many lines appear, andThicknesssets the line width. InBlockymode,Block Sizecontrols the size of the flickering blocks.
Transparency Glitch
Causes the Glitch Flicker effect to also affect the material's transparency, creating see-through glitches. This is a sub-option of Glitch Flicker.
Strength:How much the flicker affects transparency.
Transitions
Effects used to make a material appear or disappear.
Proximity Effects
Triggers visual surface transformations when approaching or moving away from a reference position (the active VR camera / player head, the object pivot, or a custom world position).
Proximity Effect settings.
Enable Proximity Effect:Master toggle.
Proximity Mode:Selects the reference position:
Camera / Player: Distance is calculated to the VR camera / player's head.
Object Pivot: Distance is calculated to the object's transform origin.
Custom World Position:Distance is calculated to a fixed (X,Y,Z) world coordinate set inCustom Position.
Proximity Action:Visual response applied as proximity factor increases:
Glow / Emission:Adds an emissive glow (Proximity Color).
Dissolve / Fade: Fades out alpha transparency smoothly.
Dither Transparency: Clips surface pixels using a screen-door dither pattern.
Color Tint:Blends surface albedo towardProximity Color.
Radius:Maximum distance threshold at which proximity begins.
Softness:Soft-edge transition falloff as a percentage of the radius.
Invert Proximity:Inverts distance response so the effect triggers when moving far away instead of close.
Proximity Color / Animate Hue:HDR color with full support for the Global Color Shift timeline.
Dithered Transparency
Fades the object out with a Bayer-matrix screen-door stipple instead of alpha blending. Dithered cutouts behave like opaque geometry, so they avoid transparency sorting artifacts — ideal for transparent fabrics, hair, and cross-fades in VR.
Dither Strength:Controls how aggressively the pattern dissolves the surface (0= sharp cutout,1= full stipple).
Chroma Key
Masks out a specific color from the final output, creating a green-screen or blue-screen effect. Useful for live streaming overlays, video production, or creative transparency effects.
Chroma Key:Master toggle to enable chroma keying.
Key Color:The color to remove from the output.
Threshold:Controls how closely a pixel must match the key color to be removed. Lower values create a tighter key (more precise), higher values remove a broader range of similar colors.
Distance Fade
Fades the object out based on its distance from the camera. Useful for level-of-detail (LOD) systems.
Start Distance:The distance from the camera where the fade begins.
Range:How quickly the object fades out over distance.
Near Camera Fade
Fades the object out when the camera gets too close, preventing transparent materials from filling the view or clipping through the player's head in VR.
Near Camera Fade:Toggles the proximity fade.
Near Camera Fade Radius:The distance from the camera at which the fade begins.
Near Camera Fade Range:The distance over which the object fully fades out.
Dissolve
Makes the object appear or disappear using a procedural pattern, often with a glowing edge.
Dissolve settings (Noise mode).
Common Properties
Amount:The progress of the dissolve effect (0-1).
Edge Width:The width of the glowing edge on the dissolve line.
Edge Color / Gradient:The color or texture ramp for the glowing edge.
Animate:Automatically animates the dissolve amount over time. You can choose between a simple Ping-Pong/Loop mode or an Advanced Timing mode that gives you full control over the animation cycle.
Mode-Specific Properties
Mode:The pattern of the dissolve effect (Noise, Wave, Spherical, Glitch).
Noise Mode:Uses aDissolve Maptexture to control the pattern.
Wave Mode:Uses aDirectionvector and aScalevalue to control a directional wipe.
Spherical Mode:Uses a world-spaceOriginpoint and aScalevalue to control a spherical reveal. Can be set to use the object's center.
Glitch Mode:Uses aBlock Sizeto create a blocky, digital dissolve. The block pattern is hashed in world space, so it stays perfectly stable and VR-safe (consistent across both eyes) regardless of camera movement.
Planar Wipe
Reveals the object with a smooth, directional wipe across its surface. Great for dramatic entrances.
Planar Wipe settings.
Direction:The direction the wipe travels across the object.
Progress:The progress of the wipe effect.
Hardness:The sharpness of the wipe's edge.
Animate:Automatically animates the wipe progress over time. You can choose between a simple Ping-Pong/Loop mode or an Advanced Timing mode that gives you full control over the animation cycle.
Vertex Collapse
Animates the model's vertices collapsing into its center point, as if being sucked into a black hole.
Vertex Collapse settings.
Amount:The progress of the collapse effect (0=Normal, 1=Collapsed).
Animate:Automatically animates the collapse amount over time. You can choose between a simple Ping-Pong/Loop mode or an Advanced Timing mode that gives you full control over the animation cycle.
Effect Distance LOD
Automatically disables expensive shader effects when the object is far from the camera, providing a significant performance boost for distant objects without requiring Unity LOD Groups. The transition is smooth and configurable.
Effect LOD Start Distance:The camera distance at which effects begin to fade out.
Effect LOD End Distance:The camera distance at which effects are fully disabled.
Effects controlled by the LOD system include procedural textures, overlays, surface styles, and other expensive per-pixel operations. Core rendering (base texture, lighting, normal maps) is always preserved regardless of distance.
Advanced Settings
Low-level controls for rendering and performance.
Parallax Mapping
Uses a height map to create the illusion of depth and relief on a flat surface. This can add significant detail without extra geometry, but can be performance-intensive.
Height Map:A grayscale texture where white is high and black is low.
Strength:How deep the parallax effect appears.
Enable Parallax Occlusion Mapping (POM):Upgrades the effect to multi-step height tracing for a much higher quality depth result with proper self-occlusion. Performance-intensive and only available on the High performance level.Max Stepsis the step limit used at steep angles, andMin Stepsthe reduced step count used at glancing angles.
Clipping Mask
Uses a texture to perform a hard clip on the material, making parts of it invisible. Unlike transparency, this is an all-or-nothing effect that works in any render mode.
Clipping Mask:The texture used for clipping.
Mask Scroll Speed X/Y:Scrolls the mask texture to create animated effects.
Mask Channel:Selects which color channel (R, G, B, or A) of the texture to use for the mask.
Invert Mask:Inverts the mask logic, making visible areas invisible and vice-versa.
Render States
Culling:Controls which faces of the mesh are rendered (Back, Front, or Off for double-sided).
Shadow Culling:Independent cull mode for the ShadowCaster pass.Back(default) is faster for closed meshes; useOfffor double-sided shadows on hair, cloth, or foliage.
Polygon Offset Factor / Units:Applies a depth bias to resolve z-fighting between co-planar surfaces (e.g. decals, blush overlays, layered clothing).
Source/Destination Blend:Low-level control over how colors are blended inTransparentmode. TheAdditiverender mode sets these automatically. Only change if you know what you're doing!
Camera & Mirror Visibility
Controls from which cameras the material is rendered. Useful for hiding parts from mirrors, showing elements only in VR headset eyes, or creating desktop/stream-exclusive effects. Enforced consistently across the main pass as well as shadow, depth-normals, depth-only, and motion-vector passes.
Visibility Mode:Show Always, Hide In Mirrors, Show Only In Mirrors, VR Headset Eyes Only, orDesktop Stream Spectator Only.
Mirror Detection Method:How mirror/reflection cameras are identified:Auto Oblique And Inverted Transform(recommended),Oblique Matrix Only, orInverted Transform Only.
Custom Camera Filter:A layer mask for fully custom per-camera control.
Stencil Buffer
TheStencil Bufferis an invisible GPU "mask layer" for your screen. Think of it likepainter's masking tape applied pixel-by-pixel onto the screen.
Out of the box, the default settings (Comp = Always, Pass = Keep) do nothing—the shader simply renders normally on every pixel. But when configured, it allows materials on different objects to communicate with each other visually without touching C# code.
Common Use Cases (Why It's There)
Portals & Magic Windows
Object A (The Portal Doorframe):Draws an invisible mask by settingRef = 1andPass = Replace. It "stamps" the number1onto the screen pixels where the door is.
Object B (The Fantasy World inside):SetsRef = 1andComp = Equal. It willONLYrender on pixels that have the number1stamped on them. From any other angle or outside the doorframe, Object B is completely invisible!
X-Ray & Wall See-Through Effects
The main character writes Ref = 2, Pass = Replace when visible.
An X-Ray outline material sets Ref = 2, Comp = NotEqual. When occluded behind a wall, it draws the glowing silhouette only where the main body isn't directly visible.
Decal & UI Masking:Restrict complex geometric effects (like a holographic grid or glowing scanline) so they only show up inside a specific 3D volume, badge, or lens on an avatar.
What Each Inspector Setting Means (In Plain English)
Setting
Analogy / Meaning
Default
Stencil Ref
The ID Tag (0–255):The number stamp you want to write or look for (e.g.1).
0
Comparison (Comp)
The Rule:When should this pixel render? Always — Render everywhere (default). Equal — RenderONLYwhere screen pixel ID matchesRef. NotEqual — RenderONLYwhere screen pixel ID is different. Never — Never render.
Always
Pass
Action on Render Success:What to do to the screen pixel ID when this object draws. Keep — Leave screen pixel ID untouched (default). Replace — Overwrite screen pixel ID with ourRefnumber. Zero — Reset screen pixel ID to0.
Keep
Fail / ZFail
What to do if the stencil test fails (Fail) or depth/wall test fails (ZFail).
Keep
Read / Write Mask
Bitwise masks (advanced, usually left at 255).
255
Quick Example Setup (Portal / Magic Window)
If you want to create a magic portal window:
Mask Material (Door Window):
Render Mode: Opaque or Cutout
Stencil Ref:1
Pass:Replace
Comparison:Always
Hidden Object Material (Object inside):
Stencil Ref:1
Comparison:Equal
Pass:Keep
Render State Overrides
Advanced hardware-level rendering controls for specialized effects and workflows. These settings directly control GPU pipeline state and should be used with care.
Depth Test (ZTest):Controls when a pixel passes the depth test. Default isLEqual(standard rendering). Set toAlwaysto render through walls (useful for VR overlays, HUD elements, X-ray glasses). Other options:Less, Greater, GEqual, Equal, NotEqual, Never.
Color Write Mask:Controls which color channels are written to the framebuffer. Default isRGBA(all channels). Set to0to create invisible geometry that only writes to the stencil or depth buffer. Individual channels (R, G, B, A) can be toggled independently.
Warning:ChangingZTestto anything other thanLEqualcan cause objects to render in unexpected order or appear through walls. Use with care, especially in VR.
VRChat Fallback Tag
Sets the material's VRCFallback override tag, which controls which standard shader VRChat swaps in when custom shaders are blocked by safety settings (e.g. when a viewer hides custom shaders or on incompatible platforms).
VRChat Fallback Tag:Selects the fallback shader (Toon, Standard, Unlit, VertexLit, Cutout, Transparent, and more).
Picking a fallback that matches your render mode keeps the avatar looking reasonable instead of flashing white for users with custom shaders hidden.
HSV Mask
A texture-driven mask that controls where HSV (Hue, Saturation, Value) color adjustments are applied. This allows selective color grading on specific parts of the material while leaving other areas untouched.
HSV Mask Texture:A grayscale texture where white areas receive the full HSV adjustment and black areas are unaffected.
Shader Diagnostic & Debug View HUD
Enables real-time in-viewport inspection of intermediate lighting and shading buffers for debugging material setups and spotting rendering issues.
DirectShading — Direct scene light attenuation and cel shadow mask.
Roughness / GI — Surface roughness and indirect diffuse irradiance.
Emission — Isolated HDR emissive buffer.
AudioLink — Live AudioLink 4-band spectrum diagnostic visualization.
TexelDensity — World-space UV texel density checkerboard to identify stretching or over/under-sampling.
Complexity — Heatmap visualization of active feature complexity.
Material Performance & Stats HUD:Displays live counts of active shader keywords, total exposed properties, current render queue, and shader variant names directly at the bottom of the inspector foldout.
Audio Link
Overview
AudioLinkallows shader visuals, textures, colors, and vertex deformations to react dynamically to live world audio in VRChat and Unity environments. FireRatShader provides full AudioLink support across both pipelines —BRPandURP — including per-feature audio modulation, a standaloneAudio Spectrum Visualizer(FFT frequency analysis), and anAudio Waveform Visualizer(real-time oscilloscope and 3D vertex mesh displacement).
When the AudioLink package is present in your project, the shader reads frequency bins, raw audio waveforms, and theme color data directly from the AudioLink texture. In the Unity Editor, the built-inAudioLink Editor Companionautomatically emulates live audio data from any playing AudioSource, allowing you to preview and fine-tune your visualizers in the Scene view without entering Play Mode or uploading your avatar to VRChat.
Per-Feature AudioLink Controls
In addition to dedicated visualizers, many built-in shader effects feature integrated AudioLink modulation toggles. When enabled, the effect's intensity, speed, or displacement scales proportionally with the amplitude of a chosen frequency band.
Pulse:Modulates the Pulse effect's emission brightness and expansion radius with the music beat.
Emission:Scales the emission strength with a chosen band, and the separateAudioLink Blinkcontrol stroboscopically blinks the glow on the beat.
Color Shift:Dynamically accelerates or slows the global Hue Shift animation speed in response to audio energy.
Vertex Distortion:Scales the amplitude of vertex glitch and displacement effects with the music rhythm.
Procedural Texture:Modulates the procedural pattern's scale and speed with audio amplitude.
Grid:Modulates the grid overlay with the chosen band. Modulation targets include Line Thickness, Grid Alpha, and Grid Color Hue.
Dissolve:Drives the dissolve amount with audio, letting objects materialize and dematerialize on the beat.
Fresnel Transparency:Pulsates the fresnel edge transparency with the music.
Glitter:Modulates glitter with the chosen band. Targets include Brightness, Sparkle Size, Sparsity, and Sparsity Inverse.
Psychedelic:Boosts the psychedelic flow and color shift with audio energy.
3D Fractal:Modulates the fractal scale and animation speed with the music.
Rim Glow:Modulates rim glow with the chosen band, targeting either Intensity or Rim Width.
Outline:Modulates the outline intensity with the music.
Ripple:Drives ripple animations from audio, modulating Strength, Radius, or Speed.
Vertex Collapse:Collapses and expands the mesh to the beat.
Glitch Scanlines:Modulates scanlines from audio, targeting Thickness, Density, or Alpha.
Decals:Each of the three decal layers has its own band selector and strength, letting logos or effects pulse with the music.
Audio Bands
Each feature link provides aBandselector and an independentStrengthmultiplier:
Bass:Sub-bass and kick drum frequencies (approx. 0–150 Hz). Best for rhythmic pulsing, heartbeats, and beat tracking.
High-Mid:Lead guitars, brass, synths, and vocal presence (approx. 500–2,000 Hz).
Treble:Hi-hats, cymbals, acoustic transients, and high-frequency "air" (approx. 2,000–20,000 Hz).
Strength:Multiplier for the audio response (0 = disabled/no modulation, higher values amplify response).
AudioLink Chronotensity Beat-Sync
Drives shader animation timelines with AudioLink's tempo-tracked Chronotensity clock instead of standard continuous time, synchronizing effects directly to musical tempo (BPM).
Enable Beat-Sync Time (_AL_UseChrono):Master toggle enabling the Chronotensity beat clock. The inspector automatically warns if a feature's beat-sync toggle is active while master beat-sync time is off, offering a 1-click quick-fix button.
Chronotensity Mode:Selects the beat division speed: 4 forward tempo speeds (1/4 to 2× speed) and 4 inverse speeds (3/4 to 1/2 speed).
Supported Features:Dedicated beat-sync toggles are available on Color Shift, Procedural Textures, Glitter, Grid Overlay, Ripple, Scanlines, Flicker, Dissolve, Outline Pulse/Shift, 3D Fractal, and Emission Pulse.
AudioLink World Theme Color Tinting
When enabled (_UseALThemeColor), dynamically tints the material using the venue's active AudioLink theme palette broadcast by world systems. You can selectively route theme tinting toAlbedo, Emission, orBothacross all four venue theme colors.
Global Audio Reactivity Controls
Global controls that shape how every AudioLink reading responds to audio. They apply to all per-feature links and both visualizers.
AudioLink Reactivity Smoothing:Smooths the audio response over time, damping sudden spikes and jitter for a more stable, reactive feel. Higher values smooth more.
AudioLink Min Floor:Remaps the lower bound of the audio value range, raising the quiet floor so weak signals never fully drop out.
AudioLink Max Ceiling:Remaps the upper bound of the audio value range, compressing or expanding the loudest peaks.
Avatar Param Fallback:When enabled, falls back to local avatar parameters / OSC inputs when no world AudioLink source is present, so your avatar's audio-reactive features still respond to your own music outside of world instances.
Per-Band Delay & Timing (History Buffer)
Independent time delays per frequency band that offset audio readings along AudioLink's rolling history buffer, letting different features react at slightly different moments of the same sound (e.g. a beat that hits the bass rows first and ripples up through the treble rows). Each ofBass Delay, Low Mid Delay, High Mid Delay, andTreble Delayshifts that band's lookups into the past; higher values delay further. This is applied consistently to all AudioLink-driven features and both visualizers.
Temporal Smoothing
FireRatShader's Audio Spectrum and Waveform visualizers support truetemporal(time-based) smoothing, which is independent of theEdge Softnesscontrol. Edge Softness only softens the visual edges of bars, curves, and scope strokes; it doesnotsmooth audio over time. Temporal Smoothing damps jitter and flicker in the audio signal itself, producing stable, fluid reactive motion.
Audio Smoothing Mode
SetAudio Smoothing Mode(underAudioLink Visualizers → Global AudioLink Controls) to choose the smoothing strategy:
Mode
Name
Behavior
Performance
0
Raw
No temporal smoothing. Visualizers read the live AudioLink frame directly (identical to the original behavior).
Zero overhead — no extra texture lookups or math.
1
Frame Blend
Blends the current AudioLink frame with the previous frame (2-frame exponential moving average). Controlled bySpectrum Temporal Smoothing. Works for the spectrum; the waveform has no AudioLink history, so it remains live in this mode.
Two samples per tap. Negligible cost.
2
Temporal Buffer
Reads a dedicatedCustom Render Texture (CRT)that maintains a persistent exponential-moving-average buffer of the spectrum and waveform, with independent attack/release envelopes.Smoothed Audio CRTmust be assigned. TheSpectrum / Waveform Temporal Smoothingsliders blend between the live and buffered signal.
One extra texture sample per tap. The CRT asset auto-updates on the GPU each frame while it exists.
Setting up the Temporal Buffer (CRT)
FireRatShader provides a one-click automatic setup that detects your render pipeline for you, as well as a fully manual workflow.
Automatic setup (recommended):
RunTools > FireRat Shader > Audio > Create Smoothed Audio CRT Asset. The tool detects whether your project uses Built-in or URP and creates the matching CRT asset next to the shader.
Select your FireRat material and runTools > FireRat Shader > Audio > Assign Smoothed CRT to Selected Material. This wires the CRT into the material and enables Temporal Buffer mode automatically.
Manual setup:
In the Project window, createAssets → Create → Rendering → Custom Render Texture. Name it e.g.FireRatAudioSmoothing.
Set its size to128 × 2, Color Format = R Float, andUpdate Mode = Realtime.
Assign itsUpdate ShadertoFireRat/AudioSmoothingCRT(ships with the shader).In a URP project, selectFireRat/AudioSmoothingCRT_URPinstead.
On the CRT asset, tuneAttack(e.g.0.02s, fast rise) andRelease(e.g.0.35s, slow fall) — the asymmetric envelope gives punchy attacks and smooth decays.
On the FireRat material, setAudio Smoothing Mode = Temporal Bufferand drag the CRT into theSmoothed Audio CRTslot.
Performance & Best Practice
RawandFrame Blendincur no cost beyond a couple of extra samples and never sample the CRT, so leaving the mode on Raw haszeroGPU overhead.
The CRT only consumes GPU time while the asset exists and is set toRealtime. If you are not usingTemporal Buffermode, you can delete the CRT asset (or set its Update Mode toOn Demand) to remove that cost entirely.
All FireRatShader variants across both render pipelines — BRP (FireRatShader, FireRatShader_Fur, FireRatShader_TwoPass) and URP (FireRatShader_URP, FireRatShader_URP_Fur, FireRatShader_URP_TwoPass) — expose identical temporal-smoothing controls.
Audio Spectrum Visualizer
TheAudio Spectrum Visualizerperforms real-time Discrete Fourier Transform (DFT / FFT) frequency analysis directly on the shader, breaking incoming sound down into individual frequency bins from sub-bass to treble.
AudioLink Visualizers section with the Spectrum enabled.
Spectrum Modes
Mode
Name
Description
Mode-Specific Parameters
0
EQ Bars
Renders discrete vertical equalizer bars resembling physical DJ mixer displays or studio graphic equalizers. Each bar samples an averaged frequency sub-band with configurable spacing and edge anti-aliasing.
Bar Count:Number of discrete frequency bars across the span (4–128). Bar Gap:Horizontal gap/spacing between adjacent bars (0–0.5). Smoothness:Anti-aliasing softness at bar peaks.
1
Continuous Curve
Traces a smooth, continuous mathematical FFT frequency curve with 3-tap neighbor smoothing. Includes an optional semi-transparent filled area underneath the curve.
Line Thickness:Stroke thickness of the spectrum curve line (0.001–0.1). Fill Alpha:Opacity of the shaded region beneath the curve (0–1). Smoothness:Line anti-aliasing softness.
2
Radial Spectrum
Transforms the frequency spectrum into a 360-degree circular radar display radiating outward from the center point, creating an energetic glowing aura, circular ring gauge, or techno-shield.
Radial Inner Radius:Radius of the central circular cutout hole (0–0.5). Edge Thickness:Softness and width of the outer radial frequency boundary. Smoothness:Angular and radial transition smoothness.
3
2D Waterfall Spectrogram
Displays a continuous temporal history heatmap of audio frequencies over time. Frequencies run horizontally while time scrolls vertically, creating a rich visual soundscape spectrogram.
Directly samples AudioLink's multi-row history buffer. Gain:Color sensitivity and response range. Mirror:Symmetrical horizontal frequency reflection.
4
Band History Strip
Renders 4 discrete horizontal history lanes side-by-side, displaying rolling history envelopes mapped across frequency sub-bands with ColorChord note tinting.
Renders a classic vertical studio volume-unit ladder meter directly within the spectrum display, showing instantaneous and peak volume levels across audio bands.
Enable Audio Spectrum:Master toggle for the spectrum visualizer. When disabled, all spectrum shader code is completely compiled out.
Spectrum Mode:Selects betweenEQ Bars, Continuous Curve, Radial, Waterfall, Band History Strip, andVU Meter.
Dual Trace:When enabled (_AudioSpectrumDualLine), renders floating peak-hold caps above EQ bars or superimposes an unsmoothed, live transient line over smoothed continuous curves.
Add VU Meter (VU Meter Overlay):Draws a standalone 4-band LED ladder meter (_AudioVUOverlay) on top of any active spectrum mode. Equipped with its own Position (Offset), Scale, Rotation, Intensity, and Color Mode (Broadcast green/amber/red segments or Low/High gradient).
Gain:Signal amplification multiplier (0.1–10). Useful for boosting sensitivity on quiet audio tracks or soft world audio.
Logarithmic Scale:When enabled, applies a power-scaled perceptual curve to frequency distribution. This expands the bass and mid-range regions while compressing high treble, mirroring human auditory perception.
Mirror:Folds the spectrum horizontally around the center (0.5), creating a symmetrical dual-wing visualizer.
Edge Softness:Controls the spatial anti-aliasing softness of bar edges, curve strokes, and radial boundaries (geometric edge AA). Temporal response damping and smoothing is handled by the shader's globalAudioLink Reactivity Smoothingcontrol (see Global Audio Reactivity Controls above).
Waterfall Heatmap:In Waterfall mode, Solid color mode serves as a single-color amplitude heatmap, while Frequency Gradient mode blends from Color (low intensity) to Color 2 (peaks).
Audio Waveform Visualizer
TheAudio Waveform Visualizerrenders the raw time-domain audio signal (oscilloscope trace, waveform ribbon, circular polar loop, stereo Lissajous figures, or 3D vertex mesh displacement), capturing instantaneous sound wave amplitude and phase.
AudioLink Visualizers section with the Waveform enabled.
Waveform Modes
Mode
Name
Description
Mode-Specific Parameters
0
Oscilloscope
Simulates an authentic cathode-ray tube (CRT) or digital laser oscilloscope. Draws a vibrant neon beam tracing the audio voltage over time, complete with a sharp inner core and exponential outer bloom glow.
Cycles:Number of waveform periods visible across the span (0.5–8). Line Thickness:Stroke width of the sharp inner beam (0.001–0.1). Glow Intensity:Brightness and radius of exponential bloom glow (0–5).
1
Ribbon
Renders a solid bipolar audio waveform filled symmetrically from the center line (Y = 0.5), similar to visualizers in modern digital audio workstations (DAWs) and SoundCloud waveforms.
Cycles:Number of waveform periods shown (0.5–8). Smoothness:Anti-aliasing sharpness at the upper and lower waveform boundaries. Features an automatic edge-fade gradient for visual depth.
2
Polar Ring
Wraps the time-domain waveform into a 360-degree circular loop around a center point. The ring pulses and distorts radially in response to incoming audio waves.
Polar Base Radius:Unmodulated resting radius of the circular ring (0.01–0.5). Cycles:Number of wave undulations around the circle (0.5–8). Line Thickness & Glow:Core thickness and neon bloom intensity.
3
Lissajous X-Y Scope
A stereo phase-space oscilloscope plotting theLeft channel on the X-axisagainst theRight channel on the Y-axis. Produces intricate, hypnotic geometric loops, circles, and figure-8 phase patterns depending on stereo width and phase correlation.
Evaluated with an unrolled 64-sample phase-space trajectory loop. Line Thickness:Trace beam thickness (0.001–0.1). Glow Intensity:Exponential glow bloom along the trajectory.
4
Vertex Displacement
Deforms the 3D model's actual geometry in the vertex shader, displacing vertices along their surface normals in real-time based on the local audio waveform value. Ideal for audio-reactive speakers, pulsating orbs, and dancing avatar elements.
Displacement Strength:Maximum vertex displacement distance along mesh normals (0–1). Uses vertex-safe LOD texture sampling for full single-pass VR compatibility.
5
Triggered Oscilloscope
Hardware-style triggered oscilloscope trace. Searches the AudioLink waveform history buffer for a rising zero-crossing to synchronize and lock the phase of periodic audio signals, eliminating waveform jitter on musical tones. Renders across a 2× zoomed display window for high-resolution waveform inspection.
Gain:Amplitude magnification. Line Thickness & Glow:Core thickness and bloom intensity. Hardware zero-crossing synchronization.
Waveform Controls
Enable Audio Waveform:Master toggle for the waveform visualizer. When disabled, all waveform shader code is completely compiled out.
Mono: Summed average of Left and Right audio channels (L + R) * 0.5.
Left: Samples only the discrete Left stereo channel.
Right: Samples only the discrete Right stereo channel.
Stereo Split:Renders Left and Right stereo channels stacked vertically or independently traced for stereo monitoring.
Cycles:Controls how many complete waveform repetitions are displayed across the coordinate space (0.5–8 cycles). (Applicable to Oscilloscope, Ribbon, and Polar modes).
Gain:Multiplier for waveform amplitude and vertical/radial deflection (0.1–10).
Line Thickness:Adjusts the stroke width of the central beam in Oscilloscope, Polar, and Lissajous modes.
Glow Intensity:Controls the exponential bloom falloff radius and brightness around neon beam traces.
Edge Softness:Controls spatial edge anti-aliasing softness for line borders and filled ribbon silhouettes.
Intensity:Master brightness multiplier (0–5).
Displacement Strength:(Vertex Displacement mode only) Multiplier for normal displacement distance.
Shared Visualizer Controls
Both the Audio Spectrum and Audio Waveform visualizers provide a consistent suite of color, coordinate projection, spatial transformation, and blending options.
Color Modes
Solid (0):Renders the entire visualizer using a single solid color (Color).
Frequency Gradient / Velocity (1):
Spectrum:Smoothly blends fromColor(for low bass frequencies) toHigh Frequency Color(for high treble frequencies). In Waterfall mode, this serves as a 2-tone thermal heatmap.
Waveform:Dynamically shifts fromColorat rest towardIntensity Colorbased on instantaneous waveform velocity and signal power.
Hue Shift (2):Animates the entire visualizer through a synchronized hue cycle over time.Hue Shift Speedcontrols the cycling rate.
Rainbow Gradient (3):Generates a rich, multi-hue spectral rainbow distributed across frequency bands (Spectrum) or flowing along the waveform curve (Waveform), with optional speed animation viaHue Shift Speed. In Waterfall mode, this provides a vibrant full-spectrum thermal laboratory spectrogram.
AudioLink Theme (4):Automatically samples the 4 world theme colors defined by the AudioLink theme system in VRChat worlds, ensuring seamless visual cohesion with world-reactive lighting installations.
ColorChord Chromagram (5):Samples AudioLink ColorChord 12-semitone chromagram data, tinting the visualizer according to the instantaneous musical pitch and harmonic profile of the track.
ColorChord Chord (6):Dynamically shifts visualizer colors according to the 4 root note colors identified by AudioLink ColorChord harmony tracking.
Beat Pulse (7):Modulates visualizer color saturation and brightness dynamically on AudioLink bass and rhythm chronotensity transients.
Projection Spaces
The visualizers can be projected onto the surface using several coordinate frames:
UV (0):Maps directly into the mesh's UV0 texture coordinates. Follows the model's skinning and texture mapping.
Screen (1):Projects in screen/viewport space. The visualizer remains fixed relative to the player's camera view, creating a HUD or lens overlay effect.
World (2):Projects onto the horizontal world-space XZ plane. The visualizer remains locked to world coordinates, ideal for dancefloors, stages, and ground decals.
Local (3):Projects onto the object's local-space XZ plane, moving and rotating with the object while ignoring internal mesh UV layout.
Transform Controls
Scale (Vector2):Tiling and aspect ratio multiplier along the X and Y axes.
Offset (Vector2):Positional offset to reposition the center of the visualizer.
Rotation (Range 0–360°):Rotates the visualizer around its center point (0.5, 0.5) in degrees.
Blend Modes
Additive (0):Adds the visualizer's emissive color directly onto the surface lighting (finalColor += visualizer.rgb * alpha). Ideal for holographic displays, laser beams, and glowing neon effects.
Emissive Lerp (1):Linearly interpolates the surface color toward the visualizer's color based on opacity (finalColor = lerp(finalColor, visualizer.rgb, alpha)). Useful for solid UI panels, opaque LED screens, and painted-on visualizer dials.
Performance Considerations & Best Practices
Zero-Cost When Disabled:All AudioLink visualizer features are protected by shader keywords (_USE_AUDIO_SPECTRUM_ONand_USE_AUDIO_WAVEFORM_ON). When a visualizer is toggled off in the material inspector, all associated variables, functions, and texture fetches are completely eliminated from the compiled shader variant, incurring0.00% GPU performance cost.
Lissajous X-Y Scope:Evaluates phase-space stereo curves using a highly optimized, unrolled 64-sample search loop. It executes efficiently on desktop GPUs, but on mobile/Quest standalone avatars, simpler modes likeOscilloscopeorRibbonare recommended for maximum battery efficiency.
Waterfall Spectrogram:Reads directly from AudioLink's pre-computed temporal history buffer rows using a single texture fetch per pixel. It requires no additional compute passes or CPU memory overhead.
VR & Single-Pass Instancing:Both visualizers sample audio data textures using LOD-explicit sampling (SAMPLE_TEXTURE2D_LODURP / tex2DlodBRP), ensuring seamless compatibility with Single Pass Instanced rendering in SteamVR and Oculus Quest without gradient artifacts.
Vertex Displacement (Mode 4):Performs vertex displacement entirely in the vertex shader. Ensure target meshes have sufficient vertex density (e.g. subdivided spheres, planes, or grids) to resolve fine waveform wave shapes.
Creator Tools & Utilities
FireRatShader includes a comprehensive suite of workflow and optimization tools accessible from the Unity Editor top menu underTools > FireRat Shader.
Re-sync All Material Keywords
Menu Location:Tools > FireRat Shader > Re-sync All Material Keywords(orFireRat > Re-sync All Material Keywords)
Purpose & Workflow:
In Unity, shader variants and features are enabled via shader keywords (e.g. _METALLICGLOSSMAP_ON, _USE_EMISSION_ON, _RENDER_MODE_CUTOUT). When materials are imported from external .unitypackage files, upgraded across shader versions, or animated by Unity Animation Clips and VRChat FX layers, serialized keywords in .mat files can become stale or desynchronized from the actual material properties.
RunningRe-sync All Material Keywordsscans every material in your project that usesFireRat/FireRatShaderorFireRat/FireRatShader_URPand invokesSetAllKeywordsto cleanly synchronize all keywords with assigned textures and property values.
When to run:Run this anytime you upgrade FireRatShader versions, import new avatar packages, or notice a material rendering unexpectedly after script modifications.
Material Color & Mask Baker:Bakes material base color, HSV hue/saturation/value adjustments, 4-channel RGBA color masks, and decal overlays directly into a single consolidated Albedo texture. WithAuto-Assign Baked Texenabled, the tool automatically assigns the baked texture back to the material and resets redundant runtime features, saving substantial fragment shader math and reducing VRChat APRS texture memory.
RGBA Channel Packer:Packs 4 individual grayscale textures or constant slider values into a single linear texture (R: Metallic/Mask, G: Ambient Occlusion, B: Detail/Thickness, A: Smoothness/Roughness), with individual per-channel invert toggles.
Smoothed Normal Baker
Menu Location:Tools > FireRat Shader > Smoothed Normal Baker(or right-click GameObject >FireRat Shader > Bake Smoothed Normals)
Purpose & Workflow:
Averages vertex normals across split UV seams and hard mesh edges, and bakes the resulting smooth vector stream intoVertex Colors (RGB), UV2, orUV3.
In the shader inspector underEffects > Outline, settingOutline Normal Sourceto the baked stream completely eliminates the broken seams and corner gaps common on anime avatar outlines.
Material Migration Converter
Menu Location:Tools > FireRat Shader > Material Migration Converter
Purpose & Workflow:
Automates converting avatar materials from Poiyomi (Free/Pro), lilToon, Unity Standard, and UTS shaders to FireRatShader.
Supports converting individual materials or batch-converting an entire avatar hierarchy, with optional non-destructive backup copy creation.
Automatically synchronizes shader keywords after conversion, so converted materials render correctly immediately without a manual keyword refresh.
AudioLink Companion
Menu Location:Tools > FireRat Shader > Audio > Create AudioLink Companion in Scene (BRP / URP)
Purpose & Workflow:
Spawns an in-editor simulation rig with an audio source and spectrum analyzer, allowing you to preview, tune, and test all audio-reactive features (pulses, spectrum visualizers, waveforms, audio-driven glitter) directly inside the Unity Editor without entering Play Mode or launching VRChat.
Runs a port of AudioLink's own analysis and publishes the same AudioLink texture, with the AudioLink component's settings and defaults, so effects look the same in the editor as with AudioLink in a world. It steps aside when a real AudioLink controller is in the scene.
Supports dynamic audio sample rates and automatically cleans up its shader data in standalone and player builds.
Multi-Material Batch Editor
Menu Location:Tools > FireRat Shader > Multi-Material Batch Editor
Purpose & Workflow:
Scans any avatar or scene hierarchy and aggregates all unique FireRat materials into a single batch inspector.
Allows editing common properties simultaneously across clothing, accessories, body, and hair (e.g. bulk performance level toggling, light mode adjustments, render mode changes, and batch material locking/optimizing).
Provides a 1-click batch pipeline converter to instantly switch all avatar materials between BRP and URP master variants.
Re-syncs shader keywords automatically after batch property edits and pipeline conversion, so lighting, render mode, and feature toggles apply instantly.
Supports full 1-click Batch Material Locking & Unlocking across all materials in the target hierarchy or scene, physically running the pass-stripping and keyword optimizer on every material in parallel.
Animated GIF (GIF89a) Importer:Decodes multi-frame animated GIFs using a pure C# engine, extracts frame delays, auto-computes the optimal grid arrangement, and bakes an optimized power-of-two GPU texture atlas with 1-click material assignment.
Frame Sequence Packer:Automatically packs loose image sequences (PNG/JPG frames) into power-of-two sprite sheets and configures material flipbook columns, rows, FPS, and playback modes.
Sprite Sheet Configurator:Inspects existing spritesheet textures to automatically calculate optimal column and row division grids and assign them to target texture slots (Base, Emission, Decal).
VRChat Quest Fallback Baker
Menu Location:Tools > FireRat Shader > VRChat Quest Fallback Baker
Purpose & Workflow:
Bakes high-end PC avatar shader composites (diffuse, decals, recolor masks, glitter, matcaps, and emission) down into lightweight mobile textures.
Automatically creates a duplicate Quest avatar material set targeting mobile-optimized shaders or FireRat Low tier with 100% texture consistency.
Bakes keywords into the generated Quest materials automatically and, for optimized low-performance or locked output, strips unused passes for mobile.
Inspector Localization
The material inspector is localized via community-maintained JSON translation packs in Assets/FireRatShader/Languages/. A language dropdown at the top of the inspector switches all section headers, property labels, and tooltips instantly.
14 languagesare included out of the box (English, Japanese, Korean, Simplified/Traditional Chinese, French, German, Spanish, Portuguese, Russian, Polish, Italian, Thai, Vietnamese, and template), with automatic English fallback for missing entries.
Hot-reloading:Language files are watched on disk — edit a JSON pack while Unity is open and the inspector refreshes immediately. You can also force a refresh viaTools > FireRat Shader > Developer > Reload Language Files.
Community contributions:Anyone can add or improve a language by copyingtemplate.json, translating the values, and saving it as e.g.nl-NL.json. Your language choice is remembered per-project via EditorPrefs.
 FireRatShader